What to draw on an engraving is easy. Algorithm and methods for making engravings on cardboard. The benefits of this type of creativity
At what age can children be introduced to engraving?
Engraving quite accessible even for small children, it is recommended to start acquaintance from 3 years old. At this age, the baby already has some drawing skills, as well as his first artistic ideas. At this age, it is recommended to create engravings only in collaboration with an adult who can reveal to the child all the beauty of this type of art and show how to create images correctly.
In general, the engraving is interesting and more older children, And adults. This is due to the fact that the pattern can vary in size and complexity. If you purchase ready-made kits, it is important to pay attention to the manufacturer’s recommended age indicated on the packaging.
To create an engraving, you can use 2 methods. The first is preparing the base yourself. To do this, you need to choose a thick sheet of paper, or better yet, cardboard, because it is more convenient to work with. For work you will also need watercolor paints, gouache, wax pencils, a candle, a stick (stichel), brushes and a container for water. The base is painted over watercolor paints. You can only take one color. But the drawings are much more interesting if the base is colored. The stripes can be drawn arbitrarily. After the base has dried, it needs to be rubbed well with a candle. It is important not to apply too thick a layer, but also not to leave gaps. Next you need to paint over the wax layer with black gouache. Sometimes you need to apply several layers of paint; it is better to use gouache that is not too liquid. Only after all the layers have dried can you begin to actually create the engraving. Using a stick with a pointed end or a special pen, you need to start scratching the dark layer so that the colored layer is visible. Wax pencils can be used to color the base. Then applying a wax layer with a candle is not necessary.
Of course, this method of preparing the base is quite labor-intensive. It is suitable for a baby with the principle of creating similar images. The child can freely scratch the base. And it doesn't matter if beautiful image It won't work the first time.
If you want to create it yourself a real masterpiece, then you should pay attention to a ready-made engraving set. It includes a base and a gravel. The contours of the future color image are usually already applied to the base on a dark layer. Making an engraving using this set is quite simple - you just need to diligently and carefully scratch the top layer along the indicated lines. You can do this together with your child, scratching one by one or simultaneously in different places on the base.
The finished works look very interesting and may well become an interior decoration. They can be placed in a frame, large ones can be hung on the wall, and small ones can be placed on a desk.
Svetlana Bolshakova
Recently, while going through my old course notes, I found two pieces of paper with a stamp, two old engravings.
This the engraving is made of cardboard

And here, in addition to cardboard, lace is used

We were shown techniques for working with printmaking and preparing clichés for prints engravings. Then I really liked this technique. It was getting close to March 8th and I decided to do something with the guys for moms engraving on a postcard. I made the cliche myself from cardboard, and the children just painted it with gouache and made an imprint on paper. The cardboard quickly became wet, peeled off and became unusable. The preparatory work seemed difficult to me and I am more interested in engraving I didn’t return to working with children. But, having found old leaves with engravings, I wanted to remember how it’s done.
Engraving on cardboard(from French. gravure) - cut out, create a relief - a type of printmaking. A relief print is made using appliqué, made up of individual cardboard elements. The thickness of the cardboard must be at least 2 mm. Engraving came from jewelry making. She is very multifaceted: linocut, metal engraving, engraving on cardboard, woodcut, lithograph. There are many ways to take impressions from natural objects: leaves, feathers, flowers. Scratching is an imitation engravings.
I want to show you how to do it engraving on cardboard. I took 2 identical cardboards 11x15 cm.

I cut out a frame from one and glued it to the second, although this is not necessary

I decided to make a vase with flowers, cut out the vase and individual elements for it

I cut out flowers, their centers, leaves and parts of leaves


I glued everything onto the base.

I decided to take burgundy gouache

But I didn't like it.

Painted it black

I pressed it hard when stroking it with my fingers on the left, again it didn’t work

I painted it again and made a print. Well, now you can stick it on paper and put it in a frame.

But after three times my cliche got wet and the elements began to separate

While searching for material on this topic on the Internet, I found recommendations for working with children using polystyrene and ceiling tiles. This is what we did yesterday with my guests, corn lovers. (I talked about this in a previous publication) - engraving using polystyrene as a substrate for vegetables. I had one such “bowl” of mushrooms, I cut it up and first tried it on my granddaughters


My gouache is good, professional and there is no need to dilute it with water. And children's gouache needs to be diluted to the thickness of sour cream. The first print may not work, but the second will be better. Such a print will never get wet and children will be able to draw a picture on their own with a ballpoint pen, paint over it with gouache and make an impression


We spread the gouache in vain; the drawing is not very clearly visible.
Publications on the topic:
The most magical time of the year has come - spring! When all nature is transformed, they arrived migratory birds, flowers bloomed, appeared.
Master class "Drummers" senior preschool age. Dear colleagues, I have already introduced you to the project “ Musical instruments their own.
To make such a carnation you will need: corrugated paper of two colors (green and red), scissors, PVA glue, a tube. To get started.
This is an exciting opportunity to try yourself as a true watchmaker and decorator. And to breathe life into your new ones.
Creative activities are an integral part of raising and educating a child. There are many types artistic arts, within which children of any age can create. For example, engraving for children is a technique that can be mastered as early as three years of age. But such creativity will also be interesting for teenagers and parents.
Engraving as a form of visual art
Very often this creative technique is put on a par with fine art. Indeed, these types of creativity have enough in common. Crafts using the engraving technique involve removing the protective layer using a special tool - a spatula or a pen. Today on sale you can find ready-made kits for creating such a masterpiece. An alternative option is to make the craft inside and out with your own hands. Let's take a closer look at this technique and try to understand why engraving is useful for children?
Factory-made ready-made art kits

Today, in any toy or stationery store you can find a wide variety of sets for children's creativity. Among them there are also those that are intended for creating. Typically, such a set includes a base for creating a three-dimensional drawing, a special spatula/sticker and instructions. A white or colored base may be hidden under a black background. For ease of use, usually the lines along which the tool should be drawn are already marked in color on a black base. The cost of the “Engraving for Children” set ranges from 100-500 rubles. It all depends on the size and complexity of the drawing. Please note: the recommended age must be indicated on the packaging young artist. For the little ones, choose simple pictures small in size, and for older children and adults - more complex. Attention! At the age of 3-5 years, children are recommended to make engravings only in collaboration with adults. The task of parents is to tell children about this creativity, show the basic techniques and control the entire process.
Making an engraving using a candle
If you want to make a creativity kit no worse than in the store, you can do it yourself at home. To do this, take a cardboard picture; you can use, for example, a page from a torn book. Cut the base to the appropriate size. Next, rub it with a regular candle or a piece of paraffin. The layer should be smooth and uniform. Then cover the workpiece with a thick layer of gouache without adding water. Leave to dry for several hours. After which your engraving for children is ready, you can start creating. Invite your child to clear the entire picture or some of its elements. You can also take an ordinary piece of cardboard, paint it randomly with paints, and then cover it with wax and gouache. It is more convenient to draw pictures on such an engraving without completely removing the paint.
How to make an engraving with your own hands without wax or paraffin?

If you don't have a candle at home, don't be upset. Take cardboard or a sheet of thick paper and paint the base well with these pencils, and on top, as in the first method, apply gouache and dry. Another option involves using a ready-made picture and film. Regular packaging bags, file folders or thin plastic packaging will do. Glue a piece of film to the base with a glue stick, apply gouache on top and dry. Making engravings is also possible from glossy pictures. And this is one of the most simple ways. Take a page from a magazine, a coloring book cover, or some other glossy picture. Apply gouache directly onto it and after it has completely dried, start creating. Preschoolers are advised to use thin tools when creating engravings and try to hold them like a pencil or pen - this will help adapt their hand to writing.
The benefits of this type of creativity

Children's prints are interesting and very useful crafts. This type creativity develops fine motor skills, teaches the child to be attentive and diligent. If you use a store-bought set, your baby learns to trace and draw the correct lines. Many children enjoy homemade engraving bases that have no markings on them. When working with such material, each time you have to guess what is hidden under the paint and where it should be erased. Freehand drawing on a base to create an engraving with a multi-colored background is also interesting. Try creating with your child, using both ready-made kits and homemade ones. Remember that the finished craft can become a wonderful interior decoration or a great gift for a holiday to one of the relatives.
Creativity for children means limitless opportunities for self-expression and development. Never forget this and try to regularly do a variety of decorative crafts with your daughter or son.
Today in specialized stores you can find a lot of different sets for children's creativity: educational, educational, and simply entertaining. Such toy products attract the attention of children, but it is much more interesting to create something similar with their parents, thereby learning all the secrets of the creative process.
And in fact, many children's creative kits do not represent anything complicated that cannot be reproduced independently at home. For example, engravings familiar to many can be made with your own hands in just half an hour. How? Let's find out.
To create color engraving you will need:
- white cardboard (not glossy);
- wax pencils of different colors (you can also use oil pastels);
- black gouache (you can take another dark color);
- liquid soap;
- brush;
- orange stick (or other thin and sharp object for engraving).
Step 1. Create a colored background
Most prints that are sold in stores are made with a single-color background (golden or silver), but children will find it more interesting to see the picture in different colors. To do this, we paint one side of white matte cardboard in a random order with multi-colored wax crayons - the richer and more contrasting the colors, the more impressive they will look when engraved. Note: instead of wax pencils You can use regular or felt-tip pens, but they will need to be additionally sketched on top with a paraffin candle, and only then proceed to the next stage. 
Step 2. Making an intermediate layer of engraving
To make a kind of “protective” invisible layer that will not allow the colored background to be erased during engraving, you will need liquid soap. It must be evenly applied to the background mosaic. Note: you should “rub” the soap into the pastel more carefully, because the color can “smear,” that is, be transferred to an area of paper of a different color. 
Step 3. Apply a finishing layer for scratching
After the soap has absorbed into the colored background of the cardboard, you need to paint it tightly with thick black gouache. Even if in some places the paint bleeds away from the wax, it is necessary to repeat painting until the background stops showing through. You can paint over the entire sheet or part of it. 
We are waiting for the gouache to dry and our engraving is ready. (although it would be more correct to say grattage, which is just one type of engraving). Now you can pick up a thin, pointed object (for example, an orange stick, a knitting needle, an empty pen refill, etc.) and start scratching a new masterpiece. 
Today, I wanted to dedicate a master class for children to an interesting and one of the most ancient drawing techniques. We are talking about an engraving that can become a discovery of a great world fine arts both for you and for your child.
The creative streak has always been present in people and aroused the desire to leave their mark on various surfaces, which was the beginning of the creation of interesting and unusual drawing techniques. After all, what could be simpler than scratching a design on a stone, clay tablet or wood? If you fill the grooves with paint, you will get a bright pattern that will last for quite a long time. This is how one of the oldest drawing techniques - engraving - was born. She came from the jewelry business; all the tools and techniques are used by jewelers to this day. It is very multifaceted and includes many different performance techniques. These are linocuts, metal engravings, cardboard engravings, woodcuts and lithographs. The advent of engraving technology served as an impetus for the creation of printing presses.
Many great artists paid great attention to engraving and created amazing and beautiful masterpieces. One of the brightest masters was Albrecht Durer.
How to make an engraving
Creating an engraving with your own hands, no matter how strange it may seem, is quite simple. Children's drawings can easily be diversified by offering the child the engraving technique or its imitation - scratching, scratching a design plate covered with colored paint or wax.
These engraving classes at home will perfectly entertain kids and contribute to the development of a love for beauty. And they will be the first steps in art. Working with this technique helps the child develop fine motor skills, perseverance and accuracy.
Even small children can create paintings using this technique. For kids, the process can be simplified and they will need adult help. For this technique we will need:
- thin plates of polystyrene foam or expanded polystyrene;
- a stick for scratching a design, a stencil or a regular ballpoint pen.
- scissors;
— colored paper;
- paints;
- rubber roller for rolling the work.

A child can draw a design on a plate of polystyrene foam with a ballpoint pen by pressing harder on it.

The result is a drawing, the contours of which are pressed into the material.

Let's cut out the city and put it on a tray so as not to stain everything around with paint.
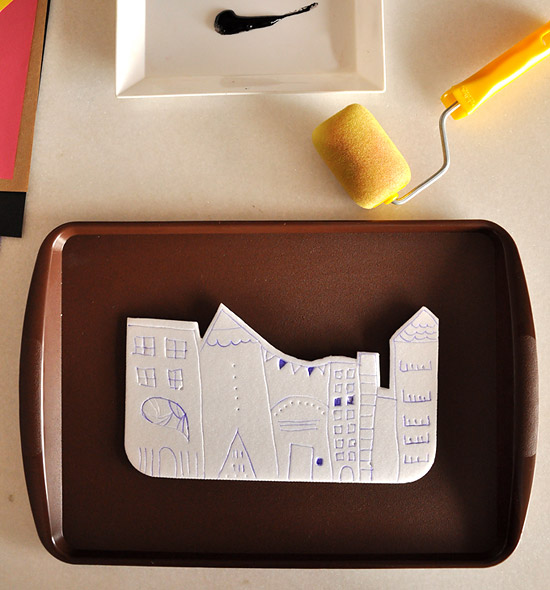
Using a roller, apply paint to the plate.

Place it on a sheet of colored paper and press firmly.

Carefully removing the plate from the paper, we will see the resulting engraving.

We also recommend
 Temple of the Tikhvin Icon of the Mother of God on Ave.
 The miraculous icon of St. Nicholas of Zaraisk St. Nicholas of Zaraisk with life
 How to smoke cheek meat at home
 Receiving a property deduction through an employer
 Interpretation of sleep to treat in dream books
 Buckwheat in a frying pan with onions and carrots Cook buckwheat with carrots and onions