How to install a windshield on a VAZ 2106
Since the process of removing and installing the side windows of the front doors on a car is the same, we will analyze the process of replacing the side glass of a VAZ 2106 using the driver's door as an example. To perform repair work we will need a wrench for “10”, “8” and a screwdriver with pliers. If everything is there, then we will begin the repair.
- Raise the glass to the top position.
- First of all, we remove the armrest; to remove it, use a screwdriver to pry up the decorative plugs of the holes and unscrew the three screws securing the armrest with a screwdriver.
- Unclench the socket securing the window lift handle and remove the handle.
- Remove the decorative trim of the inner door lock drive handle.
- Remove the decorative door trim; to do this, use a screwdriver to pry up the trim at the places where the holders are attached. If under door trim If you have a protective film, then roll it up and press it with the glass.

- Unscrew the screws securing the rear groove of the sliding glass; there is no need to remove it, since it is connected to the glass seal.
- Unscrew the screws securing the front sliding window channel and remove the channel.

- Lower the window to its lowest position; to do this, put on the window lifter handle.
- Unscrew the screws of the glass clamping clip, leaving the glass on the travel stop.
![]()
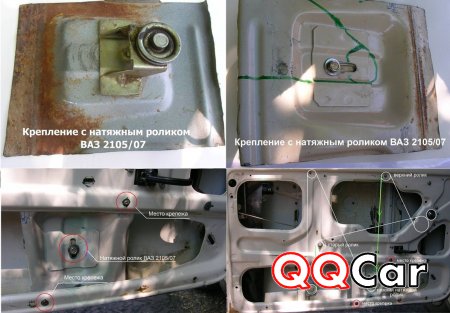
- Now we need to remove the cable from the lower guide roller; to do this, loosen the nut securing the tension roller and loosen the cable simply by squeezing it with your hand.
- Now you can remove the glass from the travel stop and lower it all the way down, while moving the glass forward a little so that it protrudes about ten centimeters and in the meantime, moving the glass through the lower door flange, you need to bring the lower edge of the glass towards you and remove it from the car.

This completes the process of removing the side glass of the VAZ 2106. Install the new glass in the following order:
- Install the glass first into the seal of the rotating glass (window window), and then into the door frame.
- Having inserted the glass into the door cavity, align it and lower it onto the travel stop, tighten the screw securing the pressure plate and put the cable on the rollers.
- Install the grooves. Install the front groove first and then the rear; do not tighten the groove screws yet. Install the front groove so that its locking mechanism engages with the tilt glass guide. The rear one must be installed so that its upper part fits under the door frame.
- Now you can install the side glass into the grooves and tighten the nuts that secure them.
- Next, you need to tighten the nut securing the tension roller; to do this, turn the window lifter handle in the direction of lowering the glass and, moving the tension roller, pull the cable and tighten the tension roller nut.
- Tighten the screws securing the pressure plate (the cable should be located between the screws).
After replacing the new one and installing it back, check the operation of the window lifter and adjust it if necessary. If the glass moves tightly in the grooves or, on the contrary, loosens a little, then adjust the grooves. Install all removed parts in reverse order. This completes the repair of our six.
Replacement windshield VAZ 2107, VAZ 2106 requires caution and precision. Before replacing the glass, make sure there are no defects on the new windshield, because... this may cause cracks in the glass.
On VAZ 2107 and VAZ 2106 cars, windshields are not glued in, so replacing the windshield will take much less time than on other cars.
However, if before replacement you notice that moisture is getting into the interior, then it is advisable to also replace the windshield seal.
To replace the windshield, you will need an assistant.
1. Using a Phillips screwdriver, unscrew the three screws securing the side plastic trim of the windshield pillar...
2. ...and remove it. 
3. In the same way, unscrew and remove the cover on the other side.
4. It’s time to remove the ceiling trim.
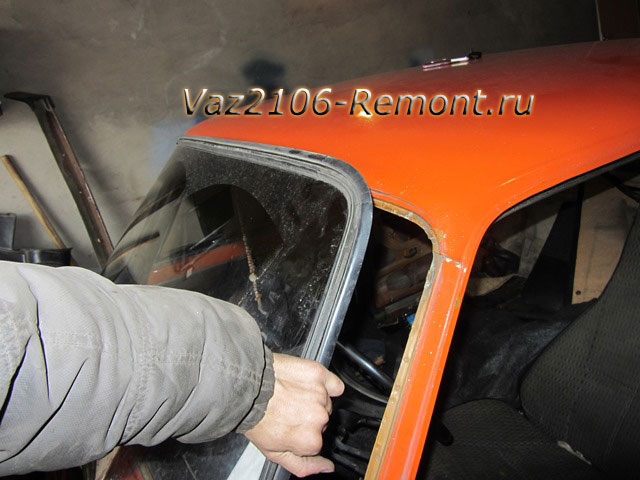
5. Having access to the windshield seal, we begin removing the old glass from any upper corner of the glass.
6. Place a flat-head screwdriver against the inner edge of the windshield seal and push it out past the flange. Let's fix the seal in this position. To do this, insert a screwdriver into the resulting gap. To prevent the glass from cracking, do not insert the screwdriver deeply. Using a second flat-head screwdriver, in the same way, along the upper edge of the glass, we continue to squeeze out the seal behind the roof flange. 
First, we’ll “walk” along the top of the glass, and then squeeze out the seal from the side parts of the glass. When only the lower part remains, simultaneously squeeze it out of the opening from both sides of the glass... 
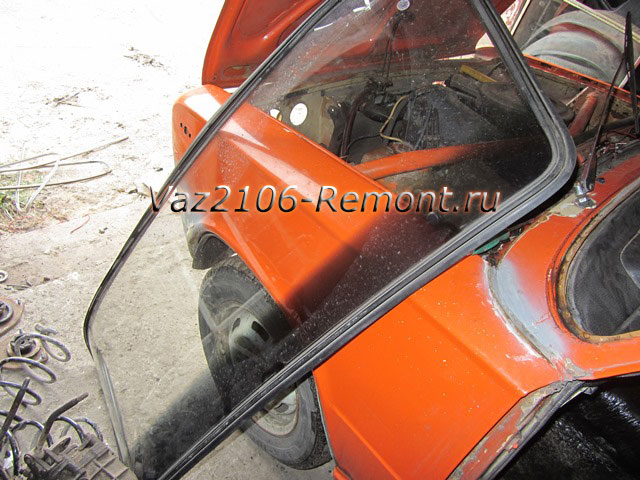
7. ...and remove the glass from the car along with the seal.
8. Remove the edging and sealing rubber from the glass.
9. Thoroughly clean and wash the contact points between the seal and the body, and if necessary, touch up the paint. We also clean the seal from fragments of old glass and dirt.
10. Spread a soft cloth on the hood so as not to damage the new glass and lay the glass on the cloth.
11. Straighten and place the seal on the windshield. We start from the corners and stretch along the entire perimeter.

12. Next, we tuck the edging into the seal. We close the junction of the edging with a lock. 

13. Thread a strong cord with a diameter of 4–6 mm and a length greater than the perimeter of the glass into the outer cut of the seal. The cord should overlap in the middle of the bottom edge of the glass. 
14. Place the glass on the body opening and center it.
15. From the outside, gently press on the lower part of the glass and hold the glass pressed while the assistant, who is in the cabin, and the assistant begins to slowly pull the cord out of the seal, alternating the ends of the cord. We help the seal sit in place by pressing the seal with your fingers. Using this method we will “sag” the entire lower part of the glass.
16. Carefully, applying gentle blows with the palm of your hand to the upper edge of the glass, striking from top to bottom, “sink” the glass. 
18. We fill the upper part of the seal by pulling the cord from the sides to the middle and pressing the glass with your hand, “helping” the seal to sit deeper on the flange. 
19. We assemble the remaining parts of the car (ceiling lining and roof pillars) in the reverse order.
To replace the windshield and rear windows of a VAZ 2106, you will need: a screwdriver, a blanket (or something similar) to place under the glass, a piece of cord (preferably nylon slippery) with a diameter of 3.5-4 mm and a length of about 5 m.USEFUL TIPS
Replace the windshield and rear windows with an assistant. Pay attention to the marking in the upper right corner of the windshield. Purchase new glass with the same markings. Moreover, to avoid buying fake glass, check its strength by rubbing it with a cloth moistened with a solvent. The markings on branded glass cannot be removed, but on counterfeit glass they are often easily washed off.
 1. Move the windshield wiper arms and blades away from the windshield.
 2. Unscrew the three screws securing the decorative trim of the front side pillar of the body and remove it (the right one is shown, the left one is located symmetrically).
3. Remove the rear view mirror (see “Rear view mirrors of the VAZ 2106”).
4. Remove the sun visors and their holders.
 5. Disconnect the front fastening of the right handrail (see “VAZ 2106 interior fittings”).
 6. Remove the decorative trim for the left ceiling lining mounting.
 7. Remove the screw and remove the cover holder.
NOTE
The pad is held in place by its own elasticity, but it is better to have an assistant support it.
 8. Remove the trim.
 9. Pry up the seal in the upper corner of the windshield and move it behind the body flange.
NOTE
Operations on the right corner of the windshield are shown. On the left, the work is performed in the same way. Work can be done on both sides simultaneously.
USEFUL ADVICE
If the windshield seal has hardened, remove the trim.  To do this, slide the trim covering the joint of the edging in the middle of the lower part of the seal...
  ...by opening the joint.
The windshield of the VAZ 2106 is the most vulnerable of all car glazing, so it is necessary to resort to replacing it most often. Even a small chip caused by a pebble or thorn can spread over time and form a crack over the entire area, making replacement unavoidable. The procedure for replacing a windshield is not complicated and you can do it yourself with only a couple of flat-head screwdrivers on hand. It is advisable to have a large size so that the pickup area is larger. I used drums as they are quite wide and were perfect for making this repair:
First of all, you need to pry the “lock” from the bottom center of the elastic band and remove it, and then use a screwdriver to pry off the edging:

And then we pull it with our hand, removing the edging along the entire perimeter of the glass:

Now about the dismantling process. I personally did this operation several times and began to pry it from the upper left corner. First, insert one screwdriver so that the sealing rubber disengages from the body from the inside.

Then, from the inside, gently pressing on the edge of the elastic with a screwdriver, push it outward in small sections (approximately 1 cm):

To avoid problems, you need to free half of the glass from the inside from the rubber band, that is, push it out, as shown in the photo above. That is, in this way we reach from above somewhere to the rear view mirror, and from below, respectively, to the middle of the instrument panel. After this, we pry up part of the windshield from the outside and carefully pull it towards us, slowly loosening it from side to side. Please note that there should not be much effort. If the glass does not give in, then you do not need to use much force; it is better to remove the rubber a few centimeters at a time.
The glass is removed along with the rubber band and after that you can install a new one in its original place.
If you buy a new one, you can buy a VAZ 2106 from the factory, produced by BOR, at a price of 1200 rubles or 1500 rubles. with a black stripe at the top. Installation is carried out in the reverse order and it is also necessary to act with extreme caution so as not to damage the glass.
Many drivers complain about uncomfortable windows in cars of the Soviet automobile industry. They often jam, open and close on their own, and make annoying creaking and grinding noises. In addition, such windows are often used by intruders trying to take over your vehicle. Therefore, we will begin to remove them and install full-fledged front windows.
Replacing front windows is not as simple as it might seem at first glance. The fact is that a fourth roller will appear in the door, and the route of the cable that raises and lowers the glass will change radically. In order to properly make the replacement, you will need the following tools: wrenches, hammers, drill, pliers, a set of screwdrivers, files (round, flat and triangular), a grinder, drills that will match the size of the holes already existing in the car door, and protective equipment (glasses and gloves). Let us remind you that in the previous article we talked about how to do it yourself.
Consumables
Front windows just for your car.
Glass guides.
Raw rubber.
Two pairs of seals.
Rollers and velvets.
Brackets
Window lifters.
Crackers for fastening the casing.
Front side windows from VAZ 2107 to VAZ 2106 - video
Installation of side windows from VAZ 2107 to VAZ 2106
We remove everything from the door, leaving only the frame. Don't be afraid to drill out aluminum rivets. Moldings are removed by removing the plugs. The velvet may have to be torn off, since sometimes it is glued so that it does not make unnecessary sounds. To remove the window, unscrew the two screws in the places where it is attached. We remove the window regulators. We mount the purchased upper roller near a similar upper roller. Using a grinder we cut out the bottom roller.


We also recommend
 Temple of the Tikhvin Icon of the Mother of God on Ave.
 The miraculous icon of St. Nicholas of Zaraisk St. Nicholas of Zaraisk with life
 How to smoke cheek meat at home
 Receiving a property deduction through an employer
 Interpretation of sleep to treat in dream books
 Buckwheat in a frying pan with onions and carrots Cook buckwheat with carrots and onions