Original do-it-yourself applique paintings. DIY fabric paintings. Master class on creating paintings for walls
Handmade paintings will perfectly complement any living space design. Of course, who can feel and emphasize the mood of a house better than its owners? Made using a variety of techniques, such details will make even a standard design special, transform a simple kitchen or living room, inspire rainbow emotions and bring coziness.
Abstraction
Do you have a lone chair in a rich lemon color in your room? Support the accent with a laconic picture painted yourself!
We are witnessing the triumph of abstract art, and in most galleries we encounter canvases that seem to have come from the brush of either a child or a dolphin. So if the difference is not significant, why not try writing your own creation? Drawing classes bring incredible pleasure, and the result simply cannot be bad or wrong!
A simple and elegant option is a gradient image. You don't need instructions to play it. Take a few minutes of your time, stock up on a roller or brush, two paints (main and white) – a few movements, and the bright accessory is ready.
Draw broken horizontal stripes, they will resemble visualized sound waves or complex graphs, and therefore they will always be interesting to examine. Golden foil or paint will help to dilute the severity of the lines. You can leave empty spaces, and strokes should be done in one motion. It is best to combine gold with a white background, as well as contrasting rough materials - concrete or brick.
In general, images can be anything. It is not necessary to draw something intricate - even children’s blots, circles and triangles, diamonds and waves when selecting the right colors will become real poetry.


Wood paintings
Natural materials are at the peak of popularity. Small wood pictures or huge panels will complete current modern interiors in loft, modern, eco, country, and rustic styles.
As a base, use thin dried boards made of natural wood or light panels, for example, plywood. Decorate the bars with stencils, garlands, crystals, paint them or give them a fancy configuration.
Panels made from wood cuts will help bring the atmosphere of a fresh forest into your home. Sketch out a sketch and get to work. It is best to select elements of different textures and sizes - this will add naturalness to the composition. Sand the sides that will be adjacent to the base and fix the bars, leaving the front parts in relief. Fix the finished result with glue and varnish for brightness and better preservation.


String art
Carnations and threads are not the most romantic and cute items at first glance, but you can use them to make very cute crafts. A composition from this non-standard tandem will become an original decor for the room. You are unlikely to find such a picture on someone else - after all, you made it yourself.
Consider creating a product that says “OK.” The basic materials for its manufacture you will need: light wooden board or plywood 50x50 cm; white paint; roller or brush; sketch; small carnations; threads for knitting or embroidery of different shades close to each other; sticky tape; pencil.
If the wood background is uneven, sand it with sandpaper. Apply the paint in long strokes twice. You can vary the sketch yourself or find it on the Internet and print it, group the sheets with tape. Cut the edges with scissors. Place the stencil on a dry board and secure with adhesive tape. Drive the nails into the dotted areas, starting from the top edge. An important point is that they should be approximately at the same height level and create parallel straight lines. Carefully remove the template and any remaining pieces of paper.
It's time to start weaving. To understand where to start and where to lead the thread, refer to the sketch. Tie the silhouette of the letters with black thread. Wrap the first carnation twice and make a knot, and cut off its tip. Each thread will be located in the middle of the nails. Stretch the thread and continue to outline the image, making one turn around each nail.
When you have completed the letters, move the thread away from the last nail and wrap it around the other nails. The point is that there is no clear order of nails here, choose the path of the thread randomly. When one color runs out, take another, but similar shade. Finally, fill the void inside the letter “O” and mount the finished composition on the wall.


Pictures from wallpaper
Many beautiful wallpaper with intricate patterns are so expensive that it is easier to glue banknotes instead of them. We won’t go that far, but using wallpaper as a spot decoration is a completely rational compromise. Moreover, beautiful patterns in large quantities can ripple, but we will carefully avoid these potential troubles.
So, patterned wallpaper itself is a finished canvas, so it is enough to place it inside spectacular frames. It’s good if the design and individual colors echo other interior details. Look for sales of leftover wallpaper; one roll will still be enough. Moreover, you can purchase several types of this material to create modular compositions.


Button paintings
Ordinary buttons are a very convenient material for creativity. With their help, original crafts are created by sewing or attaching with glue. This technology is universal and suitable for creating unusual paintings.
You can use the fittings to “outline” the silhouette of a letter, tree, butterfly, elephant, owl or any other object you can think of. In a sewing accessories store, select buttons in different configurations and colors, and at home, lay them out on a template and fix them on the prepared base. Cheerful works will be a wonderful and somewhat ironic addition to the design of a kitchen, living room or nursery.


Textile
Another extremely easy idea for a quick painting - take an interesting scarf or piece of fabric with a suitable pattern and cover it with a wooden board. Textiles are fastened with flat buttons or small nails.
You can cut out individual intricate elements from thick fabrics such as flannel or felt. Combine different textures, use thematic details - lace and braid, buttons.
Handicrafts will look best in the kitchen or nursery, as well as country-style rooms, which are characterized by cozy simplicity. Calm motifs are suitable for the bedroom.


Stencils
Using stencils, you can easily apply images to any surface. Thick cardboard or plywood are best suited as a base. To make the background look harmonious, you need to fill it with a shade that is contrastingly different from the color of the picture. Clear gold or silver patterns on a white background look very original.
Compositions applied with paint can be monochromatic or multi-colored. You can use flowers and leaves or a lace napkin as a stencil. Also use stick-on stencils, they will add volume to your painting.
Prepare the base and fill the background with paint if desired. After this, holding the stencil, carefully paint over the empty areas.
When the paint is dry, remove the pattern or move it and apply the next pattern using this or another pattern.


Photo printing, framed quotes
The most realistic picture- This is, of course, a photograph. To make your photos look intricate, frame them in spacious mats and hang them like an exhibition in a fashion gallery. Such an installation will be an excellent addition to a long hallway.
Another way to hang pictures is to create a structure from fasteners and cords. Use paper clips instead of frames.
You are probably aware that photographs can be enormous in size. Contact the nearest printing house or photo studio and print out photographs of your child, the sea coast, rare black and white photographs or a photo of an ordinary light bulb; it will look very stylish in shades of gray.
Ironic and motivational quotes are at the peak of popularity. Print several of your favorite sayings at once in a current elongated font and place them in laconic contrasting frames “for solidity.” Framing will give additional meaning to each word.


Eco paintings
In modern design, eco-style occupies one of the first positions in demand. Naturel is made from both living and dried plants. Vertical gardening systems, panels of succulents and stabilized moss will help revitalize the interior.
To dry leaves and flowers, use an iron, press or oven. In the summer, you can completely dry the parts on outdoors. If you want to get a voluminous herbarium, use express drying, so the vegetation will retain its natural shape. Place the most impressive exhibits one at a time. Iron the sheets between the layers of non-woven fabric and sandwich them between two panes of glass. The decor will look as if it was suspended in the air. The beauty of a herbarium is that it is easy to make yourself and update over time.
By the way, real masterpieces can be created from dry and fresh objects of botany research. It will not always be possible to fix them so that they look as grandiose as you intended, and therefore it is best to try to make something simpler or take a photo of the applique and print it. For inspiration, we selected several photographs of the work of the creative family tandem of Vicky and Brooke, who lay out unusually beautiful floral portraits from flowers and stems - by the way, without a drop of glue, and therefore they only record their work on cameras for calendars and other souvenirs.


Stages of work "Rowan"
source http://stranamasterov.ru/blog/35917
1. Select the required frame size, cut out the fiberboard - this is the basis of the work.
2. Sketch.
3. Prime the fiberboard (water + PVA glue), paint with water dispersion paint + gouache.
4. While it dries, prepare the dough. desired color. You can paint with aniline dyes during kneading (color the water), and here we are... Roll out the dough, cover it with a layer of green gouache, knead it, mix it, it becomes too soft - add flour
![]()
5. We picked up branches; they were mostly birch or elm. Light lines marked the direction of the branch.
![]()
6. Leaf - roll into a ball, flatten it so that it turns out on both sides with sharp tips. Flatten it into a flat cake and work with a cutter - veins and sharp edges.
![]()
7. We start from the bottom layer and on top of the branch. Leaf by leaf, somewhere they are on their own, somewhere they overlap each other, somewhere they bend. We wet the joint with water + glue.
![]()
You see, the work is not molded at once, but the branch grows. We disguise the junctions of branches under leaves.
![]()
8. We simplified the painting - we decided to paint the leaves first, and then sculpt the berries. Practical!
![]()
The painting is mostly gouache, but there is also some watercolor. The work is delicate, because... Do not stain the base.
![]()
9. Dirty work again! Dough colored with gouache is brighter after drying than with food coloring.
![]()
10. Helpers!!! The berries were formed into clusters, for this it is better to look at your work from a distance.
![]()
There is no photo of how rowan bunches were painted. It’s boring if they’re all the same tone, so we tinted them a little.
11. This stage is also difficult - varnishing, concentration is required. The background is not touched at all (matte and rough), only the branch with the berries is varnished.
![]()
12. Another highlight - ladybugs. They molded them separately, painted them, varnished them and glued them on.
![]()
This is the final triptych. "Gifts of Autumn"
![]()
This is a graphical diagram of the stages of work, if something is not clear. Try - create - give yourself and your friends a good mood!!!
![]()
300 grams of “extra” salt (one glass)
300 grams of flour (two cups)
200 milligrams of water (almost a full glass)
1 tbsp. spoon of subs. oils
Decor completes the design of the home, but perhaps the most exciting and interesting part begins with it. creative stage. In modern interior solutions, it has become fashionable to replace purchased elements with ones created with one’s own hands. The handmade technique is becoming incredibly popular. They not only make things for themselves, but also give them as gifts to loved ones, and especially talented craftsmen even sell their work. If open shelves can be filled with souvenirs brought from travel and cute little things (vases, figurines), then decorating the walls is sometimes confusing. Usually a layer of putty is applied to their surface, and then plaster or wallpaper. However, “solid” walls, even with beautiful coverings, still seem “bare” and create a feeling of incompleteness.
Do-it-yourself interior paintings will become an unusual decoration. They will transform your home environment and add a creative touch to your room decor. The most famous and complex painting technique that first comes to mind is painting. The art of painting images with paints is not for everyone, but there are a number of other options, one of which talent can awaken completely unexpectedly. Original pictures can be made from scrap materials: fabric, cereals, flowers, twigs, leather, beads, paper, accessories, threads. There are a lot of techniques for creating genuine masterpieces, and the creative process is so fascinating that it will suck you into a whirlpool.
Where to start and where to look for inspiration
You are excited about the idea of creating a picture with your own hands, but you are completely lost and don’t know which end to untie this knot. Try going into the room where the canvas is supposed to be placed. The very furnishings of the room, its decoration should inspire the necessary thoughts or at least set the vector. Choose a wall where you will hang the picture. Evaluate the color scheme, texture of materials, play of light. Close your eyes and try to draw a sketch in your imagination. If you stood like a pillar in the middle of the room, but still couldn’t come up with anything, then it’s time to turn to the works of other authors for help. Other people's art objects sometimes become a treasure trove of interesting ideas.
Study the technique, determine the level of difficulty of the work you like, select necessary materials. But, perhaps, the most important thing is to correctly assess your capabilities and talents as a decorator. If your level is below average, close to beginner, then it is better to test your pen on simple options. Desire alone is not enough; the complete package also includes talent and skill. If the latter comes over time after persistent practical classes, then the lack of a gift cannot be fully compensated for by diligence. The muse, as you know, is a lady with character and does not come at the first call. The sacrament of her call does not require special rituals. Each person has his own sources of inspiration, but most of us draw it from nature: its smells, sounds and sights. Be it a tree, a flower bouquet, bird trills, the aromas of freshly cut grass, the play of sun rays on the glass or the tendrils of fog on a morning field. This source of inspiration is endless. You can fall to him constantly.


Ways to create a painting
There are a lot of methods for creating paintings. Every year new and original techniques appear. Among the popular methods are:
- Silhouette paintings;
- Mosaic technique made from glass or eggshells;
- Volumetric compositions;
- Pictures made of beads, cabochons, shibori ribbons, crystals, sequins;
- Foam images;
- Illuminated decor;
- Images made from scraps of fabric, ribbons and accessories;
- Threads and cloves as a base;
- Compositions of grains, cereals and legumes;
- Eco-friendly products made from natural materials;
- Herbariums on paper;
- Embroidery.

This is a list of only popular methods, and the entire list of their names would not fit on several pages. Any material can be used in different ways, and each result will be completely different from the finished composition created using a different technique. For most projects, you only need scissors, a utility knife, needles and glue. A basic set of tools can be found in every home.


Light paintings look spectacular at night; they also serve as decorative lamps. Prepare a template with a picture. Each element is cut out separately and its contours are transferred to a sheet of plastic. It is not recommended to use completely transparent material, but a thick MDF sheet will not work either. Find an average option that will transmit light. The painting must have several levels for a three-dimensional effect, so the composition of plastic parts is split into layers. Styrofoam ribbons are laid between them. All layers are glued to each other and to the base. After drying, it is inserted into a frame. On the reverse side, a special groove is cut out for the wire. Then RGB tape is stretched around the perimeter. The groove is necessary for the controller output. The picture is ready; to appreciate its beauty, just turn off the light and press a couple of buttons on the control panel.


About twenty years ago these works became a new word in art. You will need a wooden base, small nails, a hammer and thread. First, of course, you need to apply a sketch to the canvas. Then nails are hammered along its contour. The distance between them usually does not exceed 0.5 cm. The closer the carnations are to each other, the fewer “voids” are formed in the picture. It is recommended to start with simple shapes to fill your hand. Then they take the first thread, carefully fasten it and begin to wrap each nail. Individual modules are made in different colors. Another technique uses thick woolen threads. They begin to glue them onto the base with the applied pattern. The end of the thread is attached to the center of the element and they begin to wrap it around it, forming concentric circles. The finished canvases are soft, voluminous and pleasant to the touch.


Stylish silhouette paintings
Perhaps this best option for those who can only draw flowers on the back pages of notebooks. Silhouette paintings are universal and look like classic styles, and to modern ones. They are made from paper, using paints or a marker. To make such an element, it is enough to prepare the source code. The sample is transferred to the canvas independently or duplicated from a template, and then painted over. In order to get a silhouette for the source from an ordinary portrait, you need to adjust the contrast settings in any simple Photoshop program.


To create eco-paintings, any natural materials are used: pieces of wood, twigs, stones, blades of grass, leaves, moss. The components are glued onto a thick base and placed in a frame. Triptychs consisting of several modules look unusual and beautiful. For example, the decor is based on three colors: gray, black and purple. Take dry branches and divide each one crosswise into three parts. The lowest “bun” is tightly fastened with thread. It is painted purple, glued to a black canvas and surrounded by a gray frame. The next module will be a little smaller. Inside the purple frame there is a second part of black branches on a gray canvas, which serves as a continuation of the previous composition. The last module consists of “tops”. The twigs are painted gray and placed in a black frame on canvas. purple. The triptych is placed vertically with an offset to one side. It is not recommended to cover such a composition with glass, as its relief looks natural and organic. You can decorate a bedroom or living room with unique moss paintings. An art object will bring harmony to the room and make it more peaceful.


Working with paper is represented by many techniques. IN recent years Quilling experienced a real boom: creating images using ribbons twisted in a special way. Finished product it turns out voluminous, and skilled craftsmen can recreate huge canvases with precision in small details. You can also make a relief coating from papier-mâché (soaked paper pulp). The canvas is painted on top and placed in a frame. The material is used to create individual elements using the origami technique, which are then glued to the base. Modular paintings made from small pieces of paper folded into voluminous triangles or squares using the same technique look great.


For products of this type, perhaps the shortest master class. All you need for the job is a base, cereals (you don’t have to limit yourself to legumes) and glue. A sketch of the drawing is applied to the canvas. Then its individual parts are coated with glue, and loose decor is placed on top of it. You can use not only chickpeas or peas, but also pasta, rice, buckwheat, coffee beans and even salt.


Foam sheets are made using two popular techniques. Both types use foam plastic exclusively as a base, for decoration which requires fabric. The first method will allow you to create abstractions that, with complex geometry, will emphasize the features of the interior. Solid pieces of fabric with different patterns are placed on a specially shaped polystyrene foam (usually square). The canvas is cut along the edges, which are wrapped to the back side of the base and secured to it (paper clips or glue). Such paintings do not need frames. Compositions of several canvases are usually displayed on the wall. Another technique, kinusaiga, will require more patience. A drawing is applied with a pencil onto the foam base. Start with simple geometric patterns. Then they draw along the contour with a stationery knife. Fabric scraps slightly larger in size than the element itself are placed on it. Their edges are pressed into the cuts with a thin, flat tool (metal ruler, nail file) so that there are no folds on the surface. After simple picture When you are ready, you can try more complex images with “ragged” features.
Important to know. The Kinusaiga technique, as the name implies, originated in Japan. Usually, in this way, fabrics from old kimonos, which are not usually thrown away, were reused.


To create three-dimensional canvases, any materials with a relief are used. However, paintings made from silk ribbons, leather and foamiran look more elegant. How better element will keep its shape, the easier it will be to create a composition. Leather can make very neat pictures. Individual pieces of fabric are simply glued to the base, while maintaining folds for volume. Luxurious bouquets are created from silk ribbons. The advantage of the material is its pliability: it is enough to secure the fabric in a certain position with threads, and it will preserve it. Some achieve volume by duplicating parts. Products are usually made from paper. Cut out two identical elements. Several foam “legs” are attached to the front side of one. They are glued to the underside of a second similar part. The result is a volume effect. This technique looks original in flat paintings, where individual areas become accentuated.


Almost everyone at one time or another collected maple leaves in autumn parks and dried especially beautiful flowers between the pages of books. Many people forgot about the “stash,” and years later the find, when accidentally discovered, reminded of the times of carefree youth. Flowers and leaves for the herbarium must be dried before the harvesting process. They are placed between layers of rice paper or napkins. The material perfectly absorbs excess moisture. Then the components of the future herbarium, surrounded by several layers of cardboard, are placed under a press. About a week will be enough for high-quality drying and leveling.

Flowers and leaves are attached to the base with decoupage glue. The composition depends only on the imagination of the creator. These could be bouquets of wildflowers, decorated with silk ribbons or abstract paintings. To make the canvas last longer, it is coated with a layer of varnish or epoxy resin. Decorative canvases with sakura flowers on branches painted in gouache look impressive. A similar painting can be used to decorate interiors decorated in Japanese style or minimalism.

Painting with beads and crystals
You won’t surprise anyone with products made of beads and glass beads. Jewelry made from them became popular thirty years ago. For work, it is better to purchase high-quality materials of the same size, which will help make a neat picture. The best are considered to be Yakut beads and Japanese tono. To create accent elements, it is recommended to use cabochons of appropriate colors. Semi-precious and gems polished in a special way. As a result, they are convex, but with a flat base. Beaded pictures are embroidered. Instead of thread, it is better to use thin fishing line: it is stronger and more reliable. Crystal paintings are sold in sets. The standard kit includes crystals in individual bags with numbers, two types of tweezers, a tray for small parts, a special adhesive block into which a stick is dipped to press the “diamonds” to the canvas, and a canvas with an image printed on it. Each package contains instructions. The canvas is pre-coated with a special sticky layer that holds the crystals perfectly. The latter can be round or square. More often than not, the canvases are solid without voids, but sometimes they create brilliant drawings—the outlines of animals, birds, and people—against a spectacular black background. The finished work is covered with a cloth and secured by running a rolling pin over the surface with force. The main advantage of paintings made from crystals: they do not fade, unlike embroidery, and will retain their original appearance even after years.

Bead decor should also be made according to a ready-made pattern. It can be found on the Internet or purchased in special stores for needlewomen.


Paintings on fabric
Fabric paintings are usually made from scraps. Work begins by stretching the base fabric onto a stretcher. The procedure is performed carefully, avoiding the formation of unnecessary folds. Then the drawing is applied to the canvas with a pencil. If you do not have the talent of an artist, then you can use a template. They even sell special sets where the canvas already has a pattern with numbered zones for individual colors. Then for work you will need scissors, thread, a needle and pieces of fabric. The shreds are cut out according to the shape of the element that will be “covered” with small margins and sewn to the base.


Conclusion
Paintings in the interior will become the center, the highlight of the setting. Originally designed decor cannot be used as a background; it will attract other people's views. Having tried themselves as a decorator once, many do not limit themselves to this and continue creative experiments. When the scale of the works goes beyond satisfying personal needs for decoration, they begin to be given as gifts to loved ones, and then even sold as original paintings.
Making interior paintings with your own hands is very exciting. In this case, the most affordable materials are used, such as: buttons, paper, lemon, feathers, balloons, cupcake packaging.
DIY interior paintings
Feather painting
Feel real contemporary artists, creating an amazing canvas. It will be light and airy, as it is created from feathers.

Here's what you'll need to make these interior paintings:
- feathers;
- spray paint;
- frame;
- large bead;
- glue;
- sheet of cardboard.

Then on another surface you need to paint the feathers using spray paint.

As you can see, shades of the same color look great. Therefore, you can take dark and light blue paint. Glue the feathers first on the outside of the circle, and then make rows closer and closer to the center.

When this entire surface is filled, glue a large bead in the middle.

After the glue has dried, you can frame the finished work and hang it in the bedroom or living room, or present it to a loved one as a souvenir.

This picture looks great in the interior, like the following ones.
Paper painting
Floating butterflies will certainly lift your spirits.

To create such beauty, you don't need a lot of materials. You will only need:
- colored paper in pink and white shades;
- sheet of polystyrene foam or expanded polystyrene;
- glue;
- whatman;
- scissors.

- Cut strips of pink colored paper to the desired width. The distance between the sides should be what you want the wingspan of this insect to be.
- Attach the butterfly to the beginning of the paper strip, fold the tape several times so that the insect has enough space in the square allocated to it. Outline the butterfly and cut out along the contours. You will get not one, but several insects at once.
- In the same way, folding the paper sheets into a stack of squares, cut out the remaining butterflies. Use dark pink, pink and light pink paper for this.
- Using double-sided tape, cover a sheet of polystyrene foam or expanded polystyrene with whatman paper. Draw the outline of the future figure on it using a washable marker or chalk. Start gluing butterflies, filling them this figure. When the work is completed, you can use it for its intended purpose.
Also, as in the presented photo, make the left outline of the drawing fuzzy, as if it were hovering butterflies that were gradually landing here.
Such works look especially beautiful when sunlight. You can not glue the foam, but tint it using a sponge and paint. Then glue the butterflies using double-sided tape.

You can create interior paintings by making cardboard frames with your own hands. And so that butterflies are visible on the canvas, draw their outlines on a sheet of cardboard and cut them out using a stationery knife. But the lower part of the base should be a more contrasting color so that the butterflies are clearly visible.

You can leave them snow-white or paint them.
Get busy with it interesting creativity with children. After all, they can also create original paintings with you. Each butterfly can be painted and glued to the canvas.

To make a wall panel, use heart-shaped figures. For the next work you don’t even need a frame, you only need:
- double-sided cardboard;
- scissors;
- fishing line;
- bar;
- dye;
- awl.
You should have several rows of hearts. Paint the block and tie the top parts of the fishing lines to it.
Now you can hang such a beautiful panel above the bed in the bedroom or on the wall in another room.

The creative impulse should not be restrained by the lack of some material, for example, paper. If you don't have one, use newspapers you read. Cut out hearts from them and glue them to a paper base, make a frame for your work.

If you still have ceiling tiles, this material will make wonderful interior paintings.

For these you will need leftover colored paper. By using the template presented above or creating your own, you will make such a cheerful panel.
Pictures made from buttons and corks
The following design solutions will be suggested by waste material. After all, wine corks are usually thrown away, but you can make a lot of interesting things out of them. This is the kind of work created based on this material.

For the first picture, you need to cut each cork in half, and if you have a lot of such material, then use whole elements. First draw the outline of the future masterpiece onto the base, and then fill it with blanks. If you want the picture to take on a rainbow tone, then pre-paint them.
To get such beautiful interior paintings, you can only use:
- bottle caps;
- rope;
- awl.
The next picture doesn't need a frame. You simply glue the corks in rows onto the main surface and you can attach a card here to congratulate your loved one.
If you have a lot of unnecessary buttons accumulated in your household, then you can also make interior paintings from them.

For the next one we will use:
- buttons in green and brown shades;
- glue;
- wooden plank;
- pencil.
The following will also decorate the interior.

You can put the first letter of your loved one’s name with buttons, glue them to the base and give the masterpiece to him. The motive can be very different. Make the outline of an animal or an anchor out of buttons; such works will also certainly be appreciated.
You can confess your love in the most unexpected way. Paint the wooden surface, when dry, glue pink heart-shaped buttons here. Seeing such a sign of attention, the person dear to you will certainly be happy.

Paintings in the interior can be very different. If you want to capture the dark time of day, then pre-paint the background with brown paint. It is not necessary to make it even. Spread the paint with a sponge, then it will turn out like this mysterious.

A black marker will help highlight the contours of the branches and trunk, and a rainbow crown can be made from buttons of a wide variety of colors.
If you prefer light colors when take white base, draw a trunk here with a marker or brown pencil. You can give free rein to your creative imagination and lay out this part of the tree using threads of this color. Glue buttons that will turn into colorful leaves.

Nature itself will help you paint interior pictures. Check out the following interesting ways to create them.
Method of printing interior paintings
Just dip a daisy or other flower in paint and it will turn into a wonderful printing tool. You will lean the plant against a white sheet of paper and create original designs.

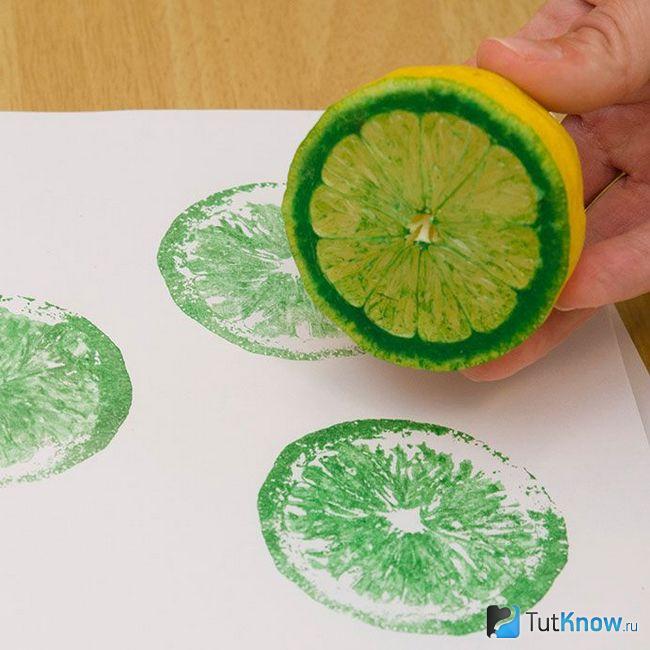
Lemon can be used for more than just its intended purpose. Dip half of this fruit into paint and print on paper.
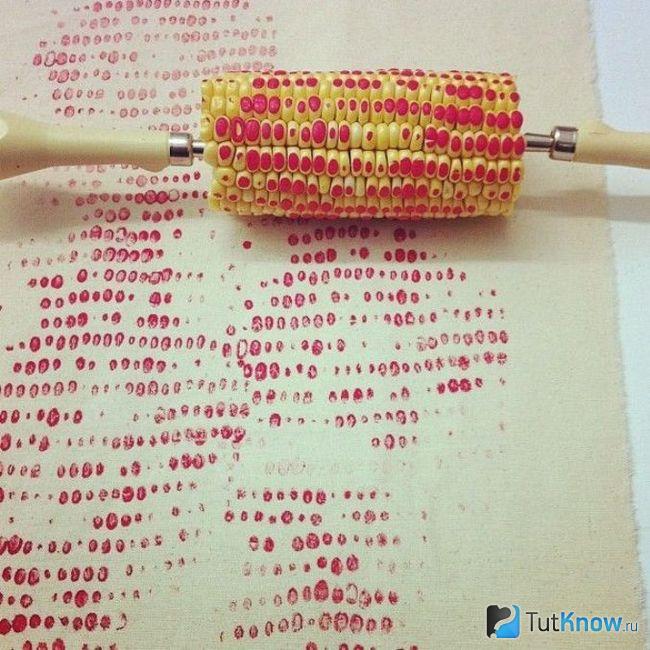
This kind of art therapy will certainly lift your spirits. You can use a wide variety of fruits and vegetables to create interior paintings. If you have an ear of corn, then cut a fragment of the required length from it, prick it on both sides with forks or other sharp objects and print to your health.
If you don’t have fruits and vegetables or don’t want to use them to create pictures, then you can take a balloon.
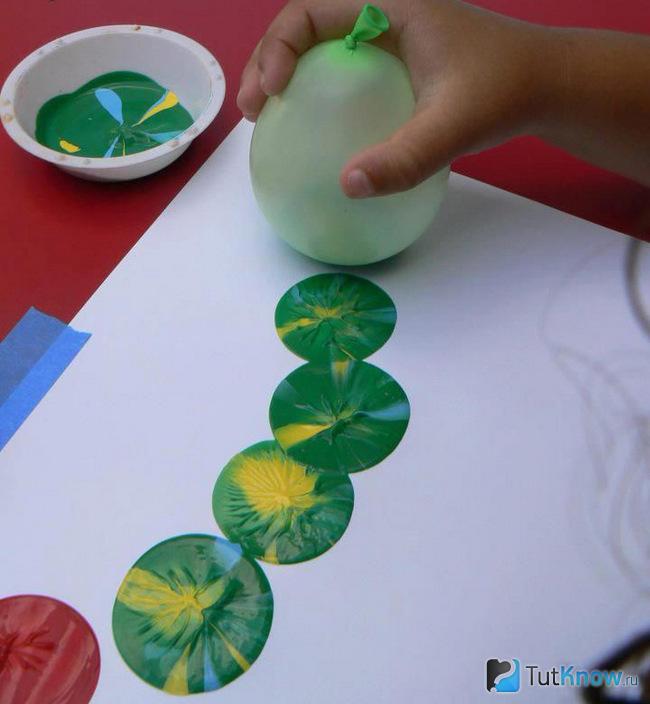
Pour paint into a bowl. And if you want the prints to be more interesting, then add paint in other shades. Dip the ball into this mass, then lift it and print patterns that you yourself come up with on a sheet of paper.
If you want to draw your favorite teddy bear, but you can’t do it, then you can make a print. To avoid damaging the toy, use water-washable paint. Dip the bear here and place it on a piece of contrasting paper.

If there are no such consumables, then you can even use your own palm. Dip it into a bowl of paint and press it against the paper base.
If you want to make a picture as a keepsake, then invite all family members to do similar manipulations. In this case, the largest palm should be printed first, and then the next ones are arranged in decreasing order. Use different colors of paint so that each print is clearly visible.

It remains to look at a few more ways that will allow you to create interior paintings. To make such masterpieces, you will need very little time.
Interior paintings on the wall in 15 minutes - master class
That's how long it will take to create your next masterpiece.

Also for the interior painting you will need:
- planks;
- dye;
- brush;
- glue;
- pictures.
You will create the next painting just as quickly. Such works will appeal to lovers of glamor.
Step-by-step master class, detailed photographs will help you quickly understand interesting idea. First you need to prepare:
- a simple pencil;
- scotch;
- glue;
- sparkles.
If you don't have glitter, then you can shred the broken Christmas ball. To do this, cover it with a cloth and gently knock on top with a hammer.
Remove the tape after the glue has dried. Where there was adhesive tape, you need to paint it using a brush. After some time, the work can be glued to the wall using double-sided tape.
If you liked these interior paintings, then create the next one using almost the same principle.
To do this you will need to take:
- picture;
- self-adhesive letters;
- white acrylic paint.
If you have even less time, then you can make a panel in the same minimalist traditions as Malevich’s black square.

To do this, cover a white sheet of cardboard with black paint using a rough brush. All you have to do is hang your masterpiece on the wall and wait for approving responses from home and visiting guests.
Even leftover fabric will give you interesting ideas.

Wrap rectangles and squares pre-cut from cardboard with such flaps. Fold the fabric over reverse side and pin here. Make a loop and hang your masterpiece using it or double-sided tape. You can create interior paintings so that you have a whole exhibition or make one or two. It all depends on the amount of free time and the availability of material.
If you have small scraps left, then you can make a voluminous flower like this.

Using the template, cut out the petals for it. Slightly bending the edge of each, glue it to the prepared surface. This can be a sheet of polystyrene foam or cardboard with non-woven material, wrapped in fabric. First create the outer circle of petals, then the next one, arranging them in a checkerboard pattern. As you move toward the center, complete your work. In the middle the petals are slightly smaller and point upward.
If there is braid left over from needlework, you can also use it. See what kind of interior paintings you can create with it.

To do this, you need to cut these tapes into strips of the same size and glue the end and beginning of each. Then you need to pull the resulting circles from 4 sides to the center, and you will get four-petal flowers. You can also quickly make a panel from cupcake and cookie packaging. Glue these paper molds to the prepared surface, see what a delicate and airy picture you get.

By applying a template of leaves to paper, you can cut out such blanks of the same size quite quickly.

All that remains is to glue them next to the paper branches and frame the finished work.
Here's what interesting works art can be created in minutes from available material. If you want to see how others make interior paintings, then your wish will be fulfilled right now.
Do not deny yourself the pleasure and see how you can make a picture whose surface will resemble marble:
It is believed that painting a picture with your own hands means not just getting a stylish addition in the form of an unusual decorative element, but also thus reflecting the individuality of the interior and your own vision of the space. If you have always had an excellent score in drawing or you even have art school, creating a canvas will not be difficult. It won't take long to get there, you just need to grab inspiration by the tail. But if you are from the category of beginners in fine arts, then our advice will come in handy. This publication will talk about how to draw a picture without having professional skills.
Creating a landscape
The painting style that we propose at the very beginning is more suitable for expressive people. Arm yourself with canvas, paints and buckets. You don't need brushes. It's better if you start creating your masterpiece on open space so as not to stain the walls and floor with paint.
Spit out your emotions and desires onto the canvas, take as many shades as you see fit, and give preference to bright tones. You can even layer applications on top of each other. As you can see, there are not only paintings drawn in pencil and watercolor. In our case, this is pure expressionism, which can give the amateur artist both a unique experience and a stunning canvas of its kind.

Abstractionism
Since the 20th century, among the recognized masters of painting, abstractionists have always been in the forefront. Looking at their masterpieces, which are now valued at fabulous sums, ordinary person may exclaim: “My little daughter draws just as well!” And all because there are no principles. Therefore, if you do not know how to draw a picture, use a genre called abstract art to create a canvas. What should you focus on when creating a masterpiece?
First of all, stock up on acrylic paints in your favorite colors. If there is a color in nature that you can admire endlessly, be sure to take it into your arsenal. Then complement the color spectrum with softer and darker shades. Now all that remains is to stock up on canvas, brushes of different thicknesses, a watercolor palette and water. Let us take into account that water will play an important role in our process.

brush stroke technique
To begin, mentally break the canvas into several parts. Start applying strokes from left to right, using the darkest shade in the palette first. The result is a color stretch of amazing beauty. Remember that acrylic paints are the most fertile material for an inexperienced painter.
You always have the opportunity to correct not-so-successful pieces of a painting on canvas by using a higher paint consistency or diluting it with water. Plus, acrylic paint dries easily, so you don't need to rush. On average, it can take no more than an hour to create a masterpiece. Now you know what picture to draw, all that remains is to complete the design of the canvas with a beautiful frame.
Frames for canvases
By the way, if you see that your canvas is self-sufficient, you can place it in a place of honor on the wall, even without a frame. Nowadays, any manifestations of non-standard approaches to design are relevant. Let's give one such example. What if you place the frame on the wall separately without the picture? It turns out that you will decorate the interior with a painting that does not exist!

Decorate the frame with flowers, bows, and any available materials. The decoration of the frame, the more impressive it will look on the wall. Don't know how to draw a picture? You won't need it. Using this technique, you can decorate an entire wall; you just need to select a dozen frames of different sizes and shapes.
Geometric patterns
For this technique, in addition to paints and canvas, you will need regular masking tape, a pencil and a foam sponge. To begin, create in your imagination some kind of geometric composition, for example, a herringbone pattern adopted from a parquet board. Now arm yourself with a pencil and sketch out the areas on the canvas that should remain white when finished. Cover these areas with masking tape. This way, you will get perfectly smooth edges of the patterns, and you will not need to waste time on outlining with a ruler. Apply a base tone to the unpainted areas.
Now your task is to complement your masterpiece with spectacular stains. Take a sponge and dip it into any paint you want to see on the canvas. Work with the base still wet on the canvas to make the stains look as natural as possible. Once completely dry, remove the masking tape. That's all, now you know what picture to draw, even if you are not good at painting.

Photo printing
If you want laconic, strict and correct silhouettes in your own painting, you can turn to professionals for help. Printing workshops provide their services to the public and produce high-quality prints on any surface. Photo retouching technology will create the illusion of a drawing made using black paint. Choose any image you like and transfer it to your wall as an original painting.
Just don’t get carried away by the images of strangers staring at you from the canvas, otherwise it will turn out like in known history“Bill painted this picture.” According to rumors, the boy depicted in the painting forced all owners of the canvas to experience many terrible moments, so much so that they had to get rid of the mysterious canvas. So the painting constantly wandered from owner to owner. More than one horror film has been created based on this legend.
That's why best images Canvases with photo printing can include animals, plants, natural phenomena, as well as the world’s most famous landmarks.
Conclusion
If you have a desire to create a unique and stylish decor in your interior with the help of exclusive paintings, draw them yourself. This way you will more fully reflect your own idea of the world, acquire a new hobby, show your imagination and gain invaluable experience. Be sure that you will never find such masterpieces in any other home, because you created them with your own hands.
We also recommend
 Contemporary heroes. Heroes of Russia. Work for courageous people
 Temple of the Tikhvin Icon of the Mother of God on Ave.
 The miraculous icon of St. Nicholas of Zaraisk St. Nicholas of Zaraisk with life
 How to smoke cheek meat at home
 Receiving a property deduction through an employer
 Interpretation of sleep to treat in dream books