Vacuum brake booster VAZ 2105 signs of malfunction. How to check the vacuum brake booster
Don't believe those who say that the brakes were invented by cowards. They were invented by very smart and long-lived people, and the vacuum brake booster was also invented by very lazy people. In order to check the need for VUT on your car, try stopping it by pressing the brake pedal with the engine off at low speed. Most likely, to come to a complete stop, you will have to press the brake pedal so hard that you will even need to sit up a little in your seat. Can you imagine if such a surprise awaits you during heavy traffic in a stream of cars, and even on a descent? Therefore, this issue simply needs to be taken seriously and with full responsibility for your own and others’ safety. So, let’s figure out how to repair a VUT and replace its components.
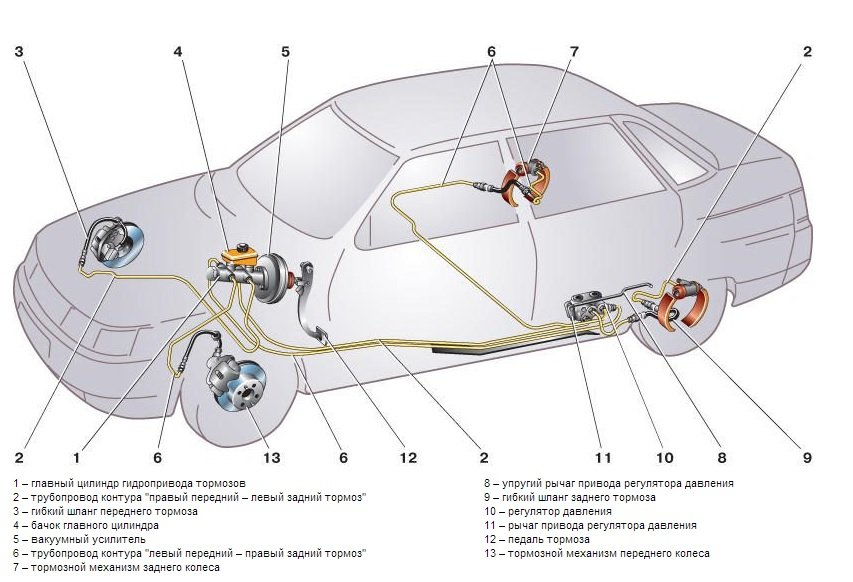
General structure of the brake system of the VAZ 2110
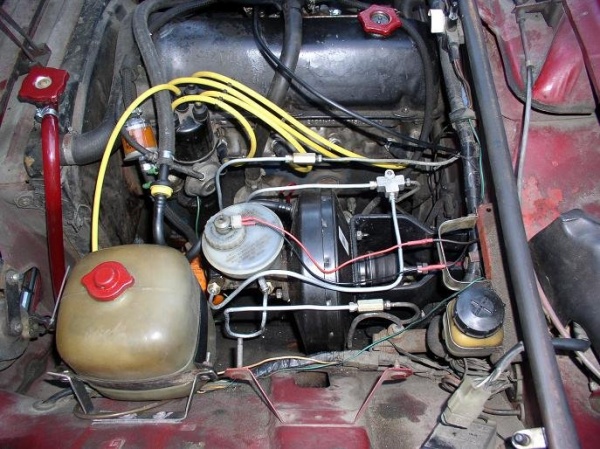
The vacuum brake booster of the VAZ-2110 is located in the engine compartment of the car between the main brake cylinder and the brake pedal.
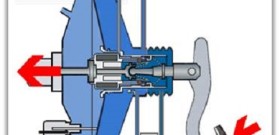
VUT layout diagram
We will briefly consider the operating principle of the vacuum brake booster in the following figure:
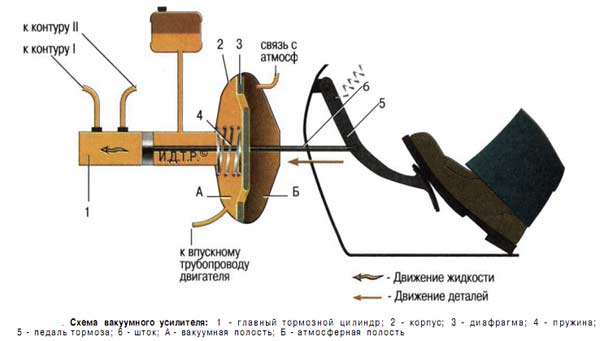
Operating principle
In the initial state, both cavities are connected to the atmosphere through a follow-up valve (not shown in the figure). When you press the brake pedal, the rod moves the diaphragm to the left, the follower valve separates the cavities and a vacuum is created in cavity “A”. And since cavity “B” is still under atmospheric pressure, both of these conditions (vacuum + atmospheric pressure) together give additional force to the braking.
You can examine in detail the operation of the entire braking system of a car in its entirety in next video lesson.
How it works (video)
DIY vacuum booster diagnostics
First of all, it must be said that malfunctions and failure of the vacuum amplifier are not fatal. There is only a characteristic difficulty when braking the car and, in some cases, a disruption in the stable operation of the engine. In any case, before the trip, you can independently conduct a fairly effective and not requiring special skills check of the operation of the vacuum brake booster, for this:
- When the engine is not running, press several times full speed brake pedal;
- Keep it pressed;
- We start the engine.
If at the same time the pedal “goes” a little to the floor, it means that everything is in order with your vacuum amplifier, but if not, then we continue further diagnostics of the system.
Main symptoms of VUT malfunctions (table)
| Signs | Diagnostics | Conclusion | Elimination method |
| Hiss when braking |
The engine is running, press the brake pedal and at the same time detect a hissing sound in the pedal area | The integrity of the diaphragm is compromised | Diaphragm replacement, total VUT |
| Hissing when the engine is running | The engine is running and a hissing sound is heard in the engine compartment. The engine runs unstably; when you press the brake pedal, the speed increases slightly briefly |
The integrity of the pipe connecting the VUT and intake manifold | Finding air leaks, eliminating, replacing the pipe |
| Soft “cotton” brake pedal | When you press the pedal, it steadily, non-stop “goes” to the floor. When braking there is no feeling of stable resistance to pressing force | Depressurization of the hydraulic system, air ingress | Searching for leaks, checking fluid levels, bleeding brakes. |
| The car does not “slow down” | When you press the pedal, the braking is delayed, the pedal travel is not enough to lock the wheels | Large free stroke of the rod | Adjust idle speed |
How to repair or replace parts
Hisses when braking (with video example)
In the following video you can hear this characteristic sound:
By the way, according to the instructions, the standard “vacuum unit” of the VAZ-2110 cannot be repaired, only replaced, but we “do it ourselves.” And judging by the number of different instructions for self-repair cars posted online, it can be argued that any domestic car enthusiast with more than five years of experience can safely be awarded the title of design engineer in absentia. Therefore, we will consider the repair procedure, especially since the difference in cost between the repair kit and the vacuum booster itself is disproportionately high.
In any case, first we will have to dismantle the VUT; for this we will need a minimum of available tools.
Tools
- Open-end and socket wrenches in sizes “10”, “13”, “17”;
- Powerful flat screwdriver;
- Repair kit or VUT assembled;
- Sealant and a little desire to do it yourself.
Dismantling
At this stage, we have a choice: either do everything as the manufacturer’s instructions say (disconnect the main brake cylinder from the VUT, unscrewing all the brake pipes from it, and then bleed it) or a little simpler and with little cost (simply moving it away to the side).
In any case, the choice is yours, but I will take the easy way:
- Disconnect the push rod from the brake pedal:
Remove the latch, pull out the finger
- Disconnect the block with wires from the brake fluid level sensor:
Disconnect the block
- Hold the check valve and remove the vacuum pipe from it:
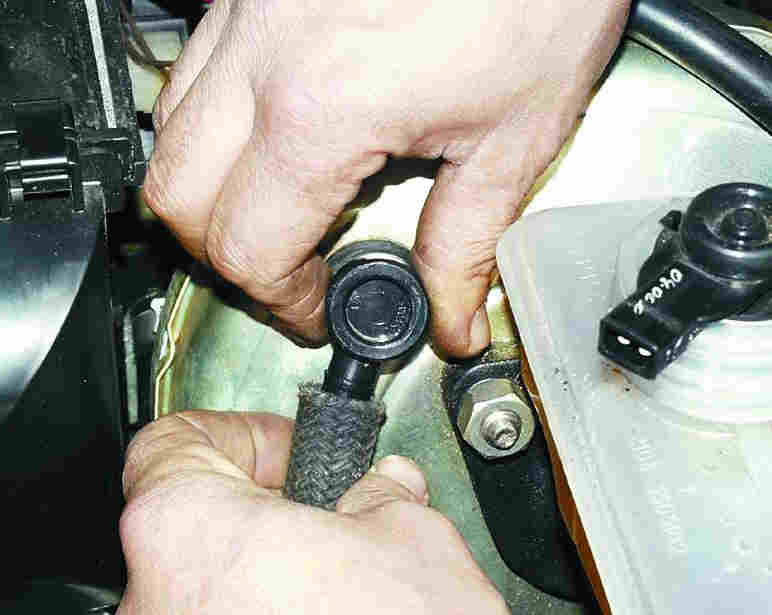
Removing the vacuum pipe
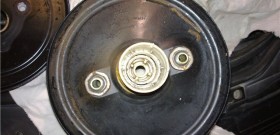
- We dismantle the vacuum booster along with the bracket:
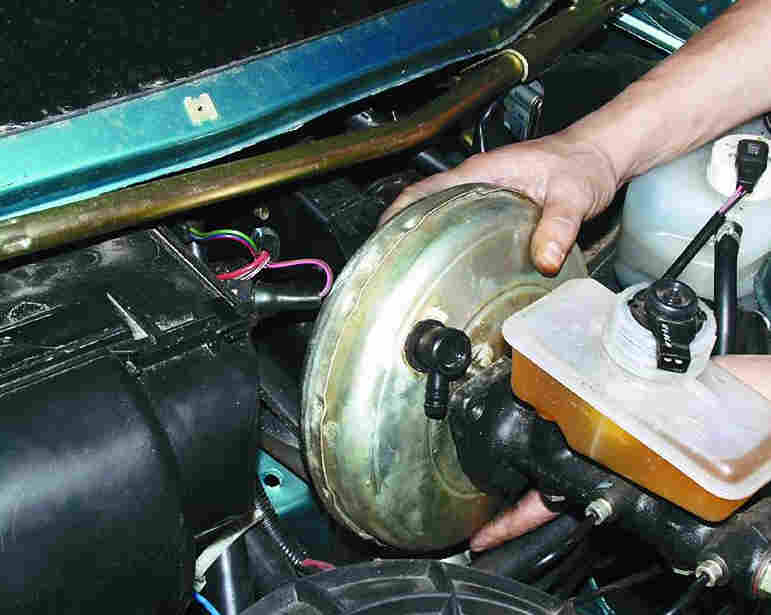
Dismantling of VUT
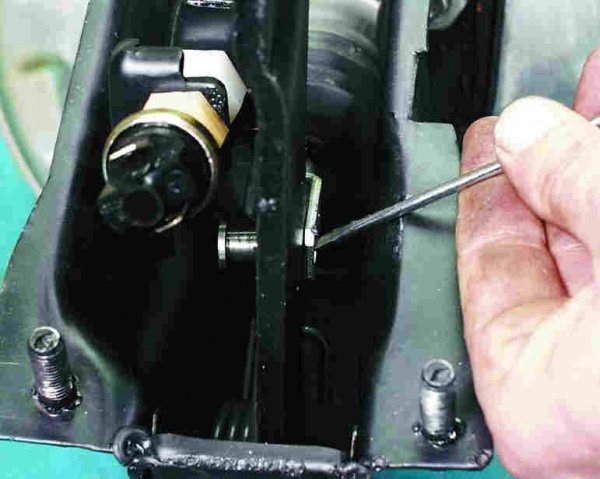
- Having unscrewed the two nuts securing the pedal bracket and prying it up with a screwdriver, we disconnect it from the “vacuum”:
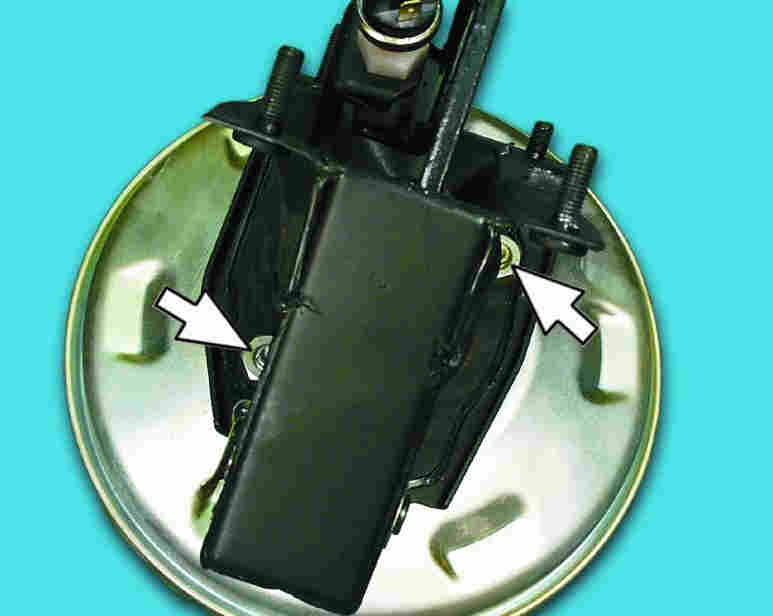
Nuts for “17”Repair
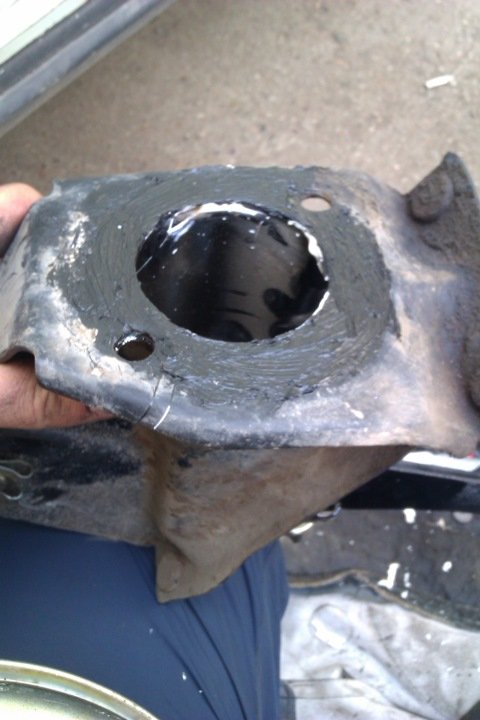
- Carefully flare the vacuum booster housing with a powerful screwdriver and hammer:
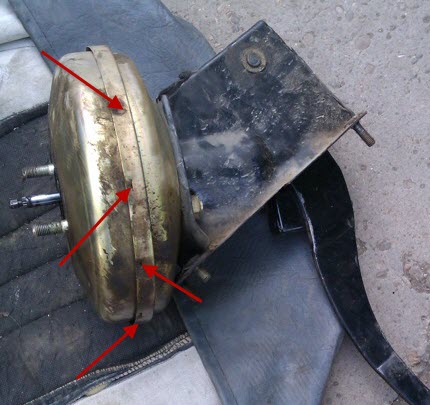
Flaring
- Since there is a return spring inside, to prevent the free half from “shooting out”, we tighten the previously unscrewed nuts onto the studs. This is the picture that opened up to us:
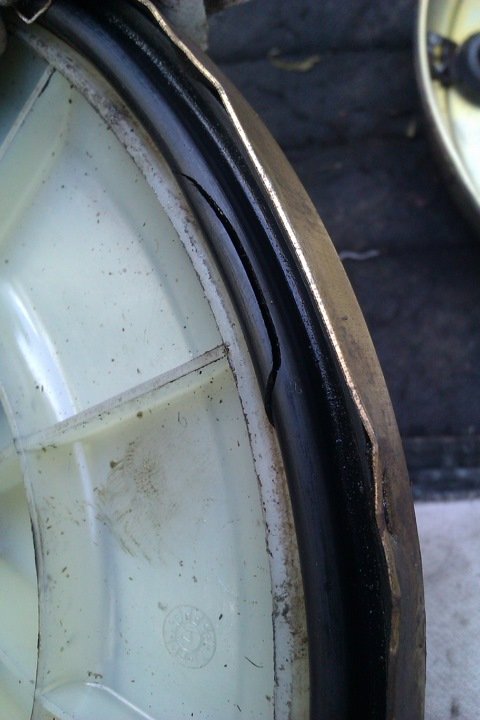
Aperture defect
- It will not be possible to disassemble the diaphragm further, since the pins securing it to the body are riveted. Simply remove the cuff from the body with a relatively light movement of the hand:
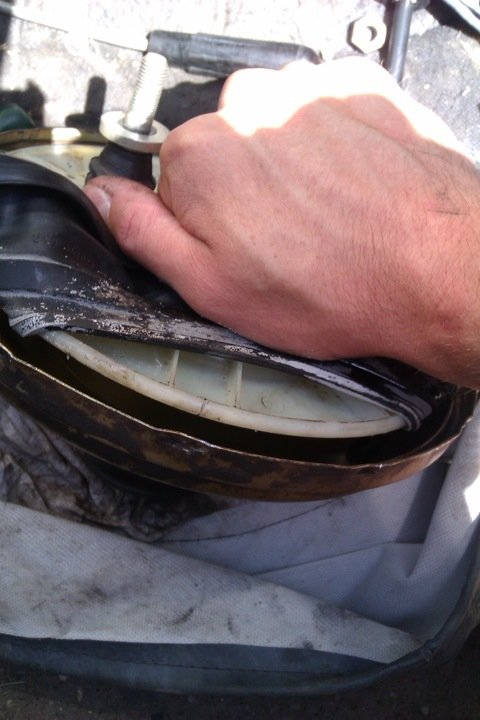
Dismantling
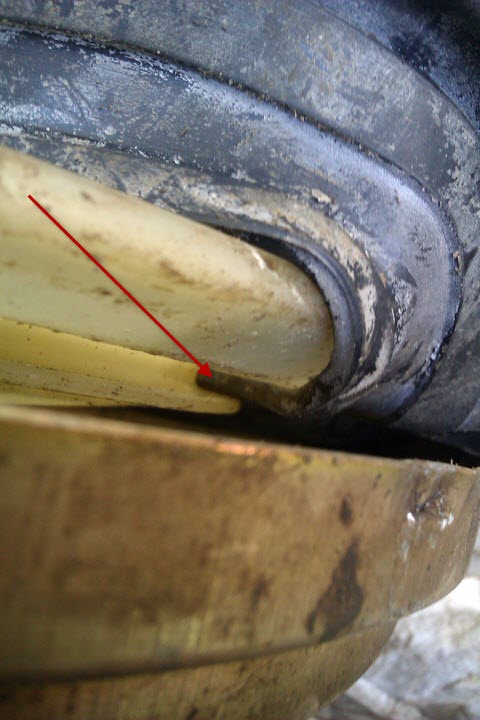
- You can see for yourself that the catalog number of the “native” and the purchased cuff matches!

Catalog number
- We install the cuff into the diaphragm body, while carefully using a screwdriver to help its edge get into the inner groove:
Internal diaphragm groove
- Next, lubricate the seat of the washer on the stud with the corrugation with sealant...
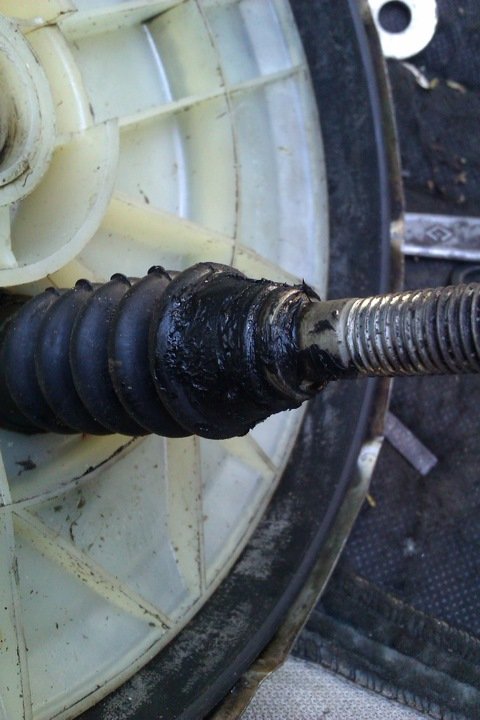
Sealant lubrication
- ...and the junction of the pedal bracket with the vacuum booster housing:
Sealing
- At this point, the repair of the vacuum amplifier can be considered complete; all that remains is to carefully roll the attachment points of the previously flared halves. Installation of the “vacuum seal” occurs strictly in the reverse order.
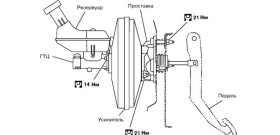
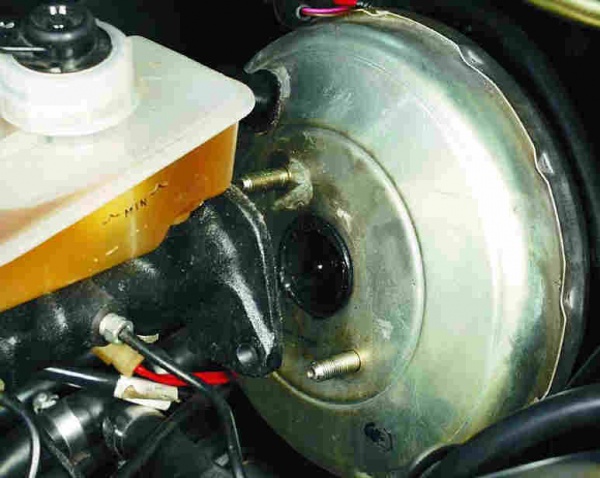
In the engine compartment, unscrew the two nuts securing the master brake cylinder to the “vacuum chamber”:
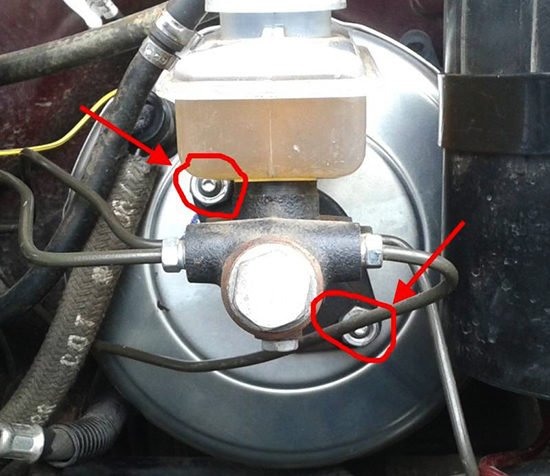
Two nuts on "17"
It is precisely at this point that all “manuals” require disconnecting the brake pipes from the brake pipe, but I suggest unscrewing just one nut securing the brake lines to the passenger compartment and simply moving the brake pipe to the side:
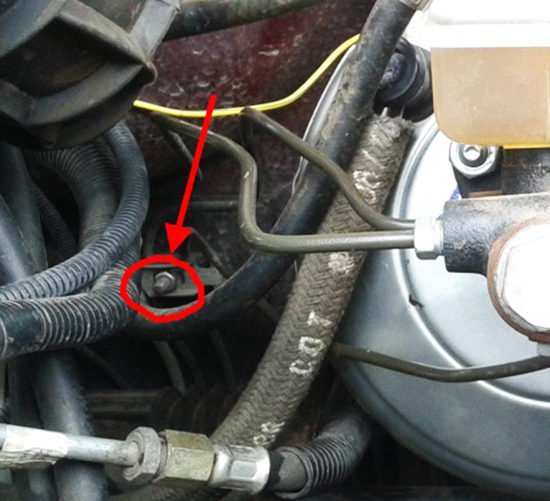
Nut on "10"
In the cabin, under the instrument panel, unscrew the four nuts securing the brake pedal bracket:
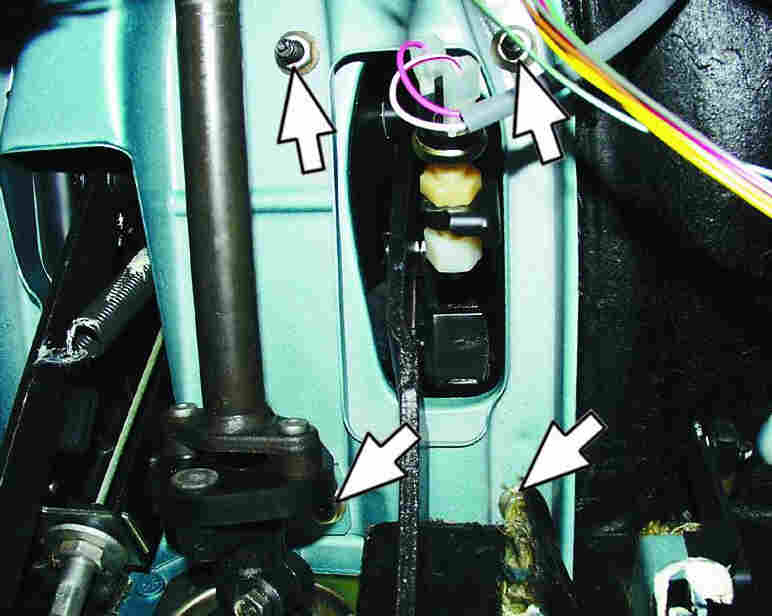
Nuts on "13"
We purchase a repair kit for VAZ - 2108/2109 in the store:
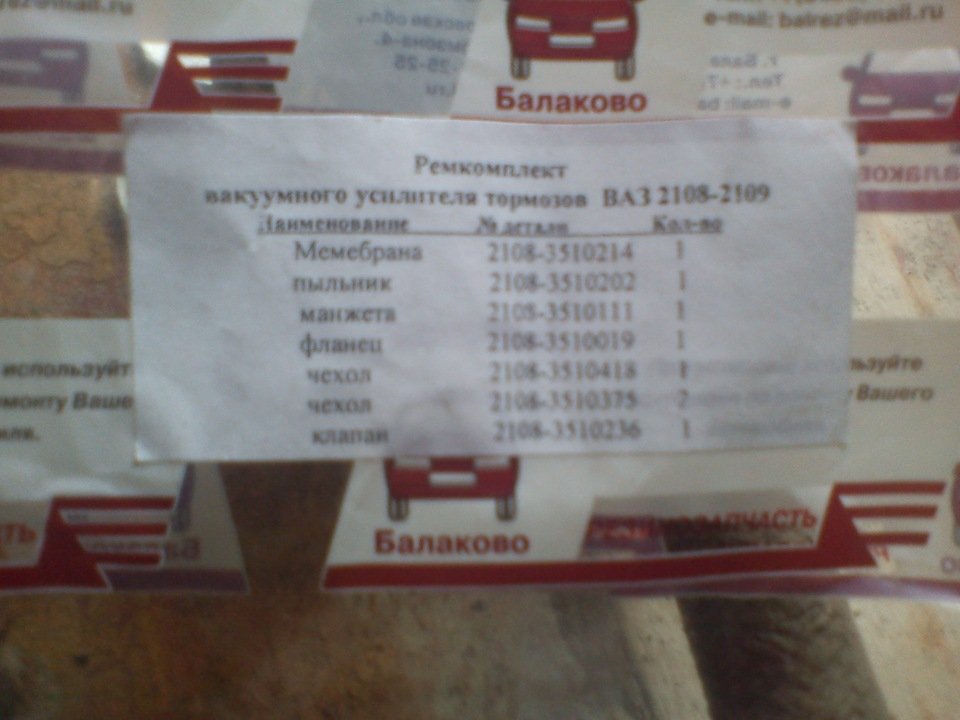
Contents of the repair kit
Hissing when the engine is running + video on diagnostics and replacement
This problem occurs when air leaks in the vacuum pipe of the brake booster. It is necessary to check for the presence of leaks both the pipe itself and its connections with the intake manifold and VUT. Since this malfunction causes depressurization of the engine intake system, the air mixture in the third and fourth cylinders becomes depleted and the engine begins to “sputter.” You can learn more about diagnosing this malfunction in this video instruction.
Soft, “cotton” brake pedal
As a rule, in this case, air leaks into the hydraulic part of the brake system due to its depressurization. Identified by visual inspection and monitoring the level of brake fluid in expansion tank. If no leaks are detected, and the fluid level in the tank continues to decrease, then it is necessary to check the integrity of the inner cuff of the master cylinder on the VUT side.
The adjusting bolt is located at number 4
Using the adjusting bolt (No. 4), it is necessary to make sure that the pusher rod is 1.25 millimeters higher than the plane of the vacuum booster housing. As a rule, this adjustment is made by the manufacturer and there are no complaints about newly purchased VUT.
The issues of design, operation and repair of the VAZ 2110 vacuum brake booster discussed in this article are relevant for all types of domestic cars; there may only be minor differences in appearance VUT and its mounting brackets.
As you can see for yourself, despite the fact that the vacuum brake booster plays a very significant role in brake system car, identifying its faults and repairing it do not require any extraordinary skills and knowledge from you. As they say, “it’s not the gods who burn the pots.” Good luck!
The vacuum brake booster provides better vehicle deceleration dynamics and significantly increases the level of control comfort. In practice, the operation of the VUT is reflected by effective braking with minimal pedal pressure. The use of active emergency braking assistance systems significantly improves road safety.
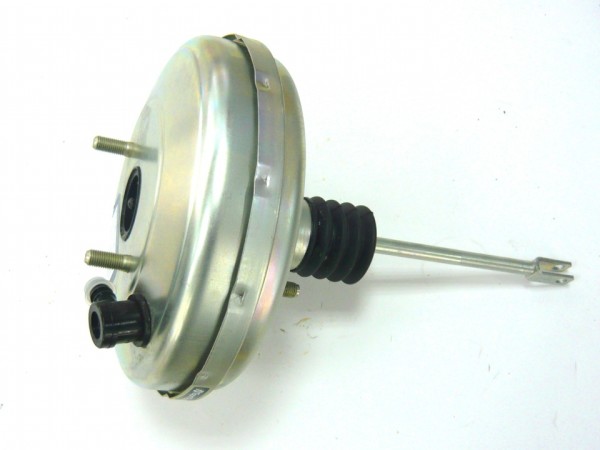
VUT device
The vacuum brake booster in most cars is located near the engine shield and is a monolithic block with a turbocharger and a brake fluid reservoir.
To enhance the braking force, the VUT design uses:
- metal case;
- a separating diaphragm made of plastic material;
- check valve;
- pedal assembly pusher;
- follow-up valve;
- hydraulic cylinder rod;
- return spring.
Operating principle
The clamping force of the brake pads in cars, the design of which does not require the installation of VUT, is pumped up by the force created by the driver when pressing the pedal. A vacuum brake booster uses differences in atmospheric pressure to create a vacuum, thereby helping to build up pressure in the brake line.
Let's start with the fact that the working diaphragm divides the body into atmospheric and vacuum (located on the GTZ side) chambers. It is connected through a pusher to the pedal. When the brakes are not applied, the follower valve maintains equal pressure in the two chambers. Depressing the brake pedal causes the follower valve to “cut” the connection. The bypass valve equalizes the pressure of the atmospheric part of the body with the engine compartment. The vacuum, which has been maintained in the VUT housing all this time, now attracts the diaphragm. As soon as the driver releases the brake pedal, the return spring returns the elastic partition to its original position.
The low pressure in the housing, which drives the vacuum booster, is created through a hose connecting the vacuum part to the intake manifold. It occurs due to the vacuum created by the piston descending to BDC during the intake of the fuel-air mixture. If vacuum gasoline engine sufficient for normal operation of the VUT, then diesel engines must be equipped with a vacuum pump designed to pump up the vacuum. Depending on the design (petal, membrane), such a device is driven by: injection pump, generator or camshaft. 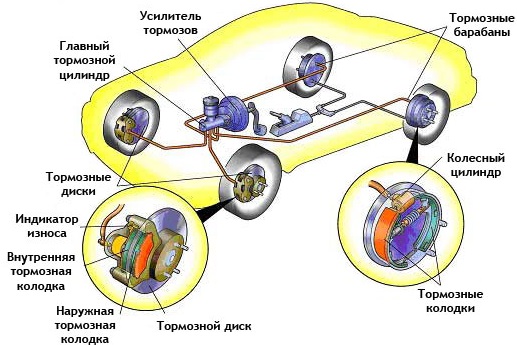
VUT breakdowns
Malfunctions of the vacuum booster can affect not only the effectiveness of the braking system, but also the operation of the gasoline engine. The main types of breakdowns include:
- violation of the tightness of the system, damage to the hose ensuring vacuum;
- diaphragm rupture;
- damage to operating valves or related parts (springs, valves).
A failed brake pressure booster will not prevent your car from braking, but it can make it significantly more difficult to drive.
If you notice changes in the operation of the booster, do not rush to change the hose or repair the brake booster. On some cars, the air recirculation damper in the cabin is directly related to the operation of the amplifier. The symptoms of depressurization of this system are similar to those that appear when the VUT breaks down.
Self-diagnosis
The simple principle of operation allows you to perform diagnostics yourself. Vacuum booster repairs should be entrusted to specialists. Several simple methods will help you determine if the system is working properly:
- After running the engine for a short time, turn off the car and press the brake pedal several times. With a working amplifier, the first press will be light, and all subsequent presses will require effort. Each subsequent pedal stroke will be shorter;
- turn off the engine and wait a few minutes. You can check the VUT for leaks by pulling out the hose that goes to it from the intake manifold. If there is a vacuum, you will hear a pop of escaping air;
- With the engine off, vigorously depress the brake pedal several times in a row. Start the engine while continuing to hold down the pedal. As soon as the engine starts, a working vacuum brake booster will make the pedal “soft” and it will fail;
- One of the most common problems is air leaks. Check the vacuum supply hose for mechanical damage, as well as the tightness of its connection to the housing. In this case, urgent repair of the VUT may be required. This “suction” of air is quite enough for the gasoline engine to start to stall;
- the engine is switched off. When you press the pedal for the first time, you should hear the sound of air entering the atmospheric part of the body. If there is none, the membrane is torn or the bypass valve is faulty.
The listed signs of a faulty brake booster will help you diagnose and fix the problem as soon as possible.
Until relatively recently, in order to stop any of the older car models, it was necessary to apply significant force to the brake pedal, and after some time a vacuum brake booster appeared in the design of cars. This device greatly facilitates driving a car, but, nevertheless, it requires periodic repairs and monitoring of its technical condition.
Vacuum brake booster design - schematic overview
The design of the vacuum brake booster is inextricably linked with. Its basis is a body divided by a diaphragm into two chambers. The vacuum chamber is located on the side of the main cylinder, where it is connected to a special check valve. It is in this area that a vacuum is created. The atmospheric chamber is located on the brake pedal side and, using a follow-up valve, is alternately connected to the vacuum chamber or to the atmosphere.
The valve itself is moved by a pusher, and the brake fluid is pumped into the working cylinders by a piston. At the end of braking, the return spring sets the diaphragm in motion, returning it to its original position. Some amplifier models can be equipped with an electromagnetic rod drive, which acts as an emergency braking system.
The principle of operation of the vacuum brake booster and signs of malfunction
The main principle of operation of a vacuum brake booster is based on the pressure difference formed in the vacuum and atmospheric chambers. It is this difference that affects the pusher, which moves the piston rod of the main cylinder of the system. In order to maintain the vacuum at the proper level, a brake booster check valve is used.
In rarefied atmosphere mode, air is sucked out of the amplifier through this valve, but does not flow back through it.
When checking the brake system, special attention should be paid to technical condition vacuum booster. Although its malfunctions do not cause catastrophic consequences, nevertheless, the brake pedal, which requires increased effort, creates discomfort and makes it difficult to control the car. There are, of course, malfunctions that will still require repair or even replacement of the device.
First of all, the vacuum brake booster hose connecting it to the manifold may depressurize or break. After a hiss is heard, the condition of the hose itself and the quality of tightening of the clamps are checked. In addition, a common cause is a torn diaphragm or old rubber in the valves, through which air can also escape.
Vacuum brake booster - how to get to the breakdown?
In order to accurately determine the malfunction, you must carefully study the vehicle's operating instructions, which describe the specific model of the vacuum booster. Sometimes the reason is quite simple, when the engine starts to stall due to excess air being sucked in and the working mixture becoming lean. When conducting a visual inspection, it is necessary to identify leaks on the amplifier housing and be sure to find out the reasons for their occurrence.
To effectively repair a vacuum booster, a repair kit corresponding to a specific model and a standard set of tools are required. Most often, the device is completely replaced with a new one installed assembled. In order to begin repair or replacement, the drive rod located in the cabin, near the steering shaft on the brake pedal, is disconnected. After this, you need to disconnect the brake master cylinder in the engine compartment. Finally, the vacuum hose from the check valve is removed. Now the amplifier is open for access, it can be repaired or replaced.
Any car that leaves the assembly line of a car factory today is necessarily equipped with a vacuum brake booster, which has long become an integral part of the braking system. It is designed to facilitate braking, allowing, with little physical effort on the part of the driver, to give maximum force to the braking system so that braking is effective.
The brake booster does not have a complex design, so problems with it do not arise so often, and some of them can be solved without resorting to replacing the entire unit. If it is necessary to carry out repairs, it makes sense to purchase a vacuum brake booster repair kit in advance, which includes parts that are subject to the greatest wear. If the amplifier is dismantled during the car repair process, many experts recommend replacing these parts, which will extend the trouble-free operation of the entire unit.
Amplifier device
It is a fairly simple device, the casing of which is internally divided into two halves by a sealed membrane connected to a rod leading to the master brake cylinder of the entire system. The first chamber of the amplifier communicates with the atmosphere and is maintained at normal pressure. The second chamber is airless, and when the engine is running, a vacuum is maintained in it, which allows the amplifier to work effectively, transferring power from the pedal to the brake cylinder.
To ensure communication with the atmosphere or a source of vacuum, the housing has a check valve for the vacuum brake booster. The intake manifold is used as a source of constant vacuum when the engine is running. This explains the fact that the device only works when the motor is on. After it stops, a vacuum remains inside the amplifier, which soon disappears.
Self-testing the amplifier
Sometimes, obvious signs of a non-functioning or poorly functioning brake booster are not so easy to spot. To avoid serious problems with this device, basic diagnostic measures should be performed periodically.
- With the car turned off, you need to press the brake pedal several times, which will equalize the pressure in the chambers. With subsequent presses, no extraneous sounds should be heard: creaking or grinding, which indicate incipient problems with the membrane or spring returning it to its original position.
- After pressing the pedal several times, lock it in the pressed position and start the car. If the pedal rises after this, the system is fully operational, if it remains recessed into the floor, the problems with the amplifier are serious, and intervention cannot be avoided.
After this, especially if some alarming symptoms are noted, you should carefully inspect the brake booster hose and its flange. Over many years of use of a car, the hose may wear out and crack, and the fasteners may lose their initial tightness - a device with such hoses will not be able to provide effective operation, since maintaining a vacuum will be impossible.
Important! A faulty brake booster has a significant impact on engine power, constantly reducing it. Therefore, in addition to reducing the effectiveness of braking itself, fuel consumption increases in parallel, and the engine may begin to stall.
Possible amplifier malfunctions
Since the device body is sealed, external influences on its internal parts are simply excluded. Therefore, all malfunctions or breakdowns are caused by natural processes of aging or wear and tear of materials. Some of the most common signs of a faulty vacuum brake booster include the following:
- valve wear;
- ruptures or cracks in the diaphragm itself;
- spring break;
- wear/cracks in the outer hoses, including those leading to the intake manifold, which ensures vacuum in the system.
For some experienced car owners, malfunctions of the vacuum brake booster are obvious, while others may drive a “triple” engine for several months, with increased fuel consumption, and not be aware of the problem. the real reason this. Air leaks through the vacuum brake booster, and the associated drop in engine power, can be fatal when trying to overtake quickly, because fast acceleration is often simply impossible.
Do-it-yourself vacuum repair
Of course, this unit is not particularly complicated, however, in order to carry out high-quality repairs yourself, it would be nice to have at least minimal skills in the field of plumbing. Before undertaking repairs to the vacuum brake booster, it is imperative that you read the instructions for maintenance this unit. This will help avoid some fatal errors that lead to the need to completely replace the unit. The repair itself does not cause any difficulties, and if due care is taken, it usually ends in success.
The repair algorithm is simple:
- familiarization with the instructions;
- disconnecting the device from the pedal;
- dismantling of the VUS;
- disassembling the case and replacing damaged elements.
It should be remembered that disassembling the vacuum brake booster should be carried out as carefully as possible, avoiding additional damage to the fasteners or the body of the device. All manipulations must be performed in a fairly clean, well-lit place. For beginners, it will be useful to remember all the stages of disassembly, so as not to make mistakes during assembly later. You may find it helpful to watch the following video:
Removing the brake booster
Before you begin dismantling, you should prepare the necessary set of tools and a repair kit if you intend to repair and not replace. In the latter case, a similar model of the unit being replaced is first purchased. The tools you will need are a screwdriver and pliers, spanners, and a special wrench that allows you to unscrew the brake pipes. It is better to immediately buy new fittings and plugs and replace them when reinstalling the unit. The dismantling process is as follows.
It will be more convenient to unscrew the assembly together with the mounting frame, and only then unscrew them. If it is necessary to replace the vacuum brake booster, then a new one is installed on the frame, screwed on, and after that the entire structure is installed in place - all that remains is to tighten the fasteners, return the cylinder to its place and connect all communications to both units.
Most modern cars are equipped with a hydraulic system. It is supplemented with a vacuum booster. This mechanism increases the force exerted by the driver on the pedal several times. In other words, it is much easier to brake with a vacuum brake. However, like any other mechanism, the amplifier can malfunction. In today's article we will look at how a vacuum brake booster works, how to check it and what its operating principle is.
Device
The design of this element assumes the presence of the following parts:
- Diaphragms.
- Atmospheric channel.
- Pusher.
- Stock
- Vacuum channel.
- Piston and return spring.
How does it work?
The operating principle is based on pressure difference. The amplifier housing includes two circuits separated by a membrane. One part of the circuit is connected to the hose (where the vacuum comes from). The other end is connected to the follow-up valve. It controls the change in vacuum and adjusts the parameters. While the car is moving or idling (when the pedal is not pressed), the diaphragm is stationary. As soon as the driver presses the brake, the vacuum is blocked by a monitoring valve. The diaphragm moves towards the brake cylinder and pushes the rod. The latter increases this effort. If you press the pedal all the way, the hole will increase. With higher atmospheric pressure, the vacuum also increases. As a result, the pedal response becomes sharper. When the pedal is released, the diaphragm returns to its place. The brake pads are released.
How to check? Method No. 1
There are several methods for diagnosing this element. All of them will be discussed in our article. So, how to check the brake booster yourself? You can diagnose the device without removing it from its installation location.  So, we start the engine and after 10 or more seconds of operation, turn it off. Next, press the pedal with normal force until it stops. If the element is working properly, the system will operate once and the vacuum will attract the diaphragm spring. Subsequent presses will release pressure in the system. The pedal travel will become less and less. But it is important for us to provide braking force precisely at the first press. If the device passes the test, it is in working order. An important point: the pedal should go down the next time it is started (if it is pressed into the floor). This indicates that sufficient pressure has built up in the system. Both circuits are OK.
Method number 2
This verification method is as follows. You need to start the engine and press the pedal. After this, turn off the engine. At the same time, keep the pedal to the floor without releasing it. After 20-30 seconds we release it. The mechanism should return to its original position because excessive pressure has built up in the circuit. If the pedal “falls”, this indicates leaks in the vacuum chamber.  The vacuum brake booster needs to be repaired or replaced. The price of a new element is about a thousand rubles. For foreign cars such as Mitsubishi Lancer, this figure is several times higher (3-4 thousand). Therefore, sometimes it is advisable to repair the vacuum brake booster. Below we will look at how to do this.
Vacuum brake booster repair: what goes wrong?
Often, when the vacuum seal breaks down, the diaphragm fails. If there are ruptures, air enters the vacuum cavity from the outer part of the housing. Because of this, the system does not produce the required vacuum. 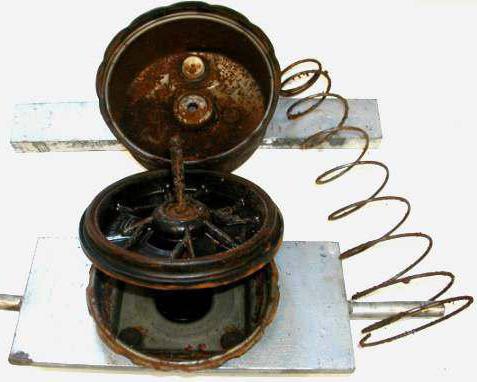 But the booster check valve also fails. The breakdown may also consist of a banal “suction” of air. Because of this, the vacuum brake booster also does not work. How to check it? When the engine is running, it will make a characteristic hissing sound. Leaking occurs due to poorly tightened clamps or leaky pipes. Less often than not, the amplifier does not work due to lack of compression in the cylinder. The vacuum hose is connected to the fourth cylinder. If the compression in it is below 9 points, problems with the “vacuum” are possible.
Dismantling
It is not possible to replace failed elements on site. The vacuum brake booster needs to be removed. VAZ classic models (including Samara) are equipped with this element near the engine shield. So, open the hood, disconnect the booster from the master cylinder. An important point is that the tubes remain in place. If they are removed, the system will become airy. 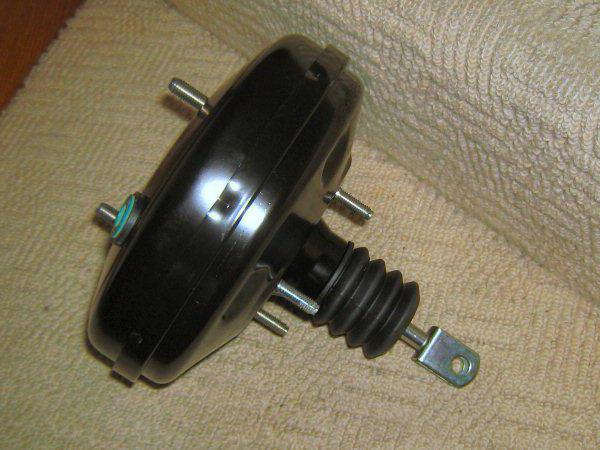 There is nothing fatal about this, but you will have to re-bleed the brakes (which means extra time). Therefore, we simply move the cylinder with the tubes to the side. Remove the hose from the check valve. Inside, we dismantle the bracket that secures the brake pedal. This way we will release the “vacuum” pusher. After this, all that remains is to unscrew the 4 fastening nuts of the amplifier itself in the engine compartment and take it out.
Disassembly and repair
Next we need a vice. We clamp the amplifier in a vice and bend the grooves for attaching the two “halves”. This is done using a minus screwdriver. On the last rivet, try to hold the outer part of the body. Since there is a spring inside, it may shoot out when disassembling the case. Next, remove two rubber covers and a plastic casing with a pusher from the mounts. 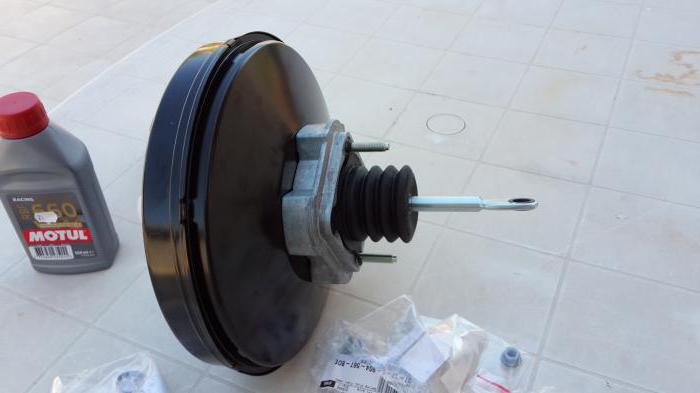 Now we remove the parts from the repair kit and install them in place of the old ones. The repair kit includes the following elements:
- Diaphragm.
- Cuffs.
- 2 covers.
- Anthers.
- Valve.
Having installed new parts, we reassemble the vacuum brake booster. We already know how to check it. During assembly, you must immediately secure the diaphragm to the plastic casing. The spring can be installed on either side. However, when assembling the case, you need to make an effort to get it onto the studs.
We perform assembly in reverse order. Before starting, perform a visual inspection. All hoses and clamps must fit snugly and be securely fastened. If the motor is running, it means there is an air leak. One of the hoses may be damaged.
So, we found out what a vacuum brake booster is, how to check it and repair it yourself.
We also recommend
 Temple of the Tikhvin Icon of the Mother of God on Ave.
 The miraculous icon of St. Nicholas of Zaraisk St. Nicholas of Zaraisk with life
 How to smoke cheek meat at home
 Receiving a property deduction through an employer
 Interpretation of sleep to treat in dream books
 Buckwheat in a frying pan with onions and carrots Cook buckwheat with carrots and onions