What do you do when installing an LPG? Do-it-yourself installation of gas equipment - basic principles, important nuances
In conditions of rising gasoline prices, everything more people wondering how to install it myself gas equipment per car. After all, everyone knows that using gas significantly saves money for the owner. On average, the cost of a liter of propane is 10 rubles cheaper compared to gasoline. Even over low mileage the difference in costs will be significant. Thus, the cost of HBO is fully recouped. All that remains is to decide on the generation of equipment, as well as the method of its installation.
You can do this yourself, but it is unlikely that you will be able to pass a technical inspection after such modification. The fact is that in order to formalize changes, you must have a certificate of conformity in hand, which is issued by the organization that installed the equipment. But this pleasure is not cheap, so most drivers do without these formalities.

Classification
How to install gas equipment on a car yourself? To answer this question, you must first understand its varieties. On at the moment There are 2 equipment options:
- HBO 2nd generation, used in carburetor models;
- HBO 4th generation, designed for injectors.
Other generations are rare. HBO 3 is intimidating due to its settings. HBO 5 is quite expensive, which reduces its economic feasibility.
Related articles:

Installation
Gas equipment is part fuel system car, so it is important to carry out the installation as carefully as possible. This work is done in the following order:
- The gearbox is placed near. It should be placed vertically. This will ensure smooth operation. Also, do not forget to organize heating of the gearbox, which will allow it to work more efficiently in low temperature conditions;
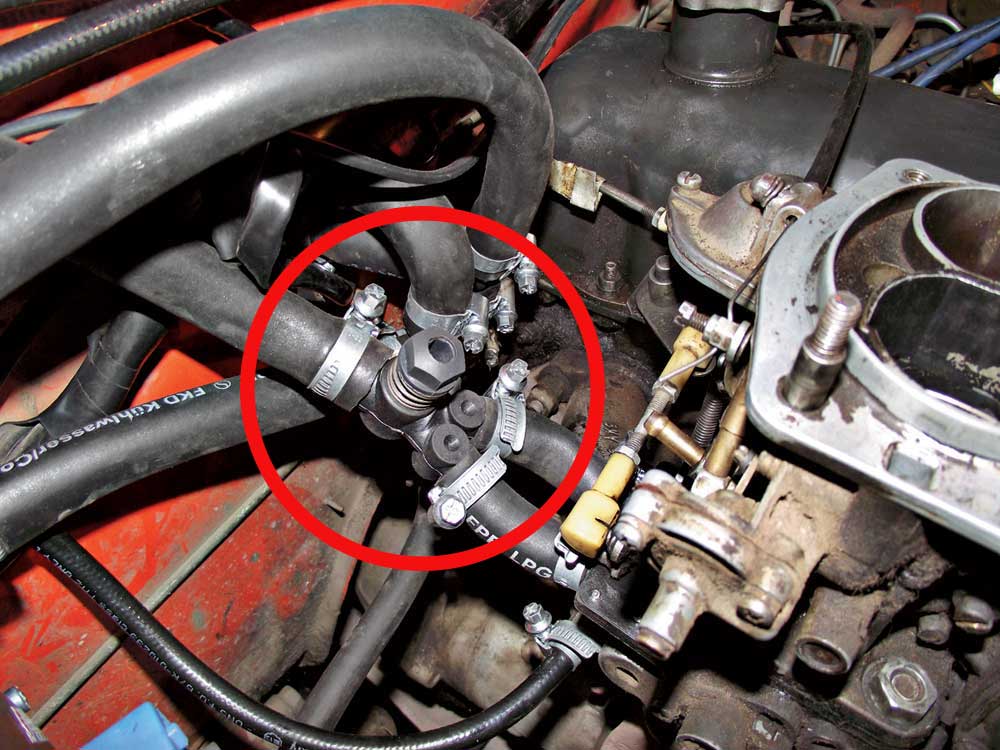
- Next, a gasoline valve is installed; it is responsible for the supply of gasoline in certain operating modes. It is located after the fuel pump; it is simply cut into the fuel supply hose;
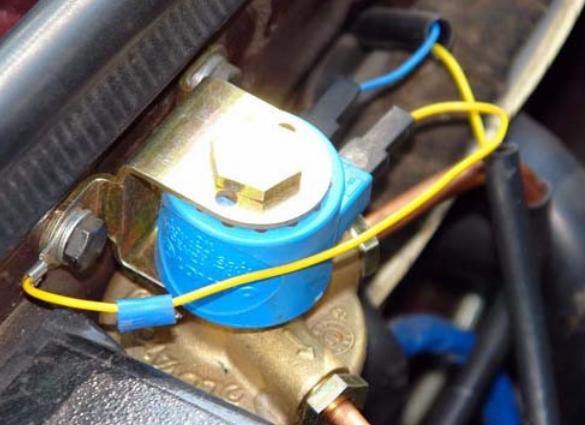
- On the other side, a gas electric valve is placed. A high pressure pipe is connected from it to the reducer. This valve should be placed in plain sight, this will make it easier to access in the event of an accident;
- The dispenser is installed. It is located between the gearbox and the mixer;
- The injector/carburetor is removed and a mixer is installed under it. It takes the place of the gasket. The injectors are additionally equipped with a fuel rail with special nozzles;
- Manufacturers are now increasingly recommending the use of plastic tubes for the main gas pipeline. Their advantage is greater ease of installation. You can also go the more usual route and install a regular copper tube. It is best to place it parallel to the gas pipeline. Manufacturers place it in the most protected place from damage;
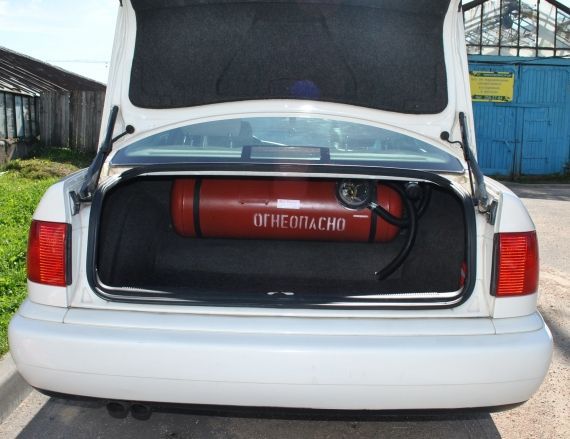
- The cylinder can be used either cylindrical or toroidal. The latter is suitable for hatchbacks and station wagons with a compartment for a spare wheel. In any case, it is necessary to make a fastening. To do this you will have to drill a couple of holes. Make sure that the metal does not come into contact with the cylinder;
- Install the filling valve. It is most logical to place it under rear bumper. Of course, there are craftsmen who cut in an additional hatch, but these are additional complications and difficulties. A tube is laid to the valve. It is best to place it under the bumper along the side member;
- For HBO 4 you will need to install a control unit. They usually place it in the salon. Also don't forget. Otherwise, problems may arise during operation.
Examination
The equipment must be checked before use. First of all, you should pay attention to tightness. To check, fill the cylinder, but not completely, 10 liters is enough. Don't forget to close the valve leading under the hood. To check, apply a soap solution to all connections and open the line. No soap bubbles should appear on any connection. If they are present, then the connection should be tightened. Sometimes this does not help, then you will have to redo the connection. After which, the tightness is checked again.
The last step is to adjust and configure the system. This is no less important stage. If the settings are incorrect, increased gas consumption will occur. The 4th generation does not need to be configured, but the 2nd generation will have to be output manually.
Conclusion. More and more people are looking to improve the efficiency of their car. Most in a simple way is the use of cheaper fuel. In this regard, the question of how to install gas equipment on a car yourself is becoming increasingly relevant. The work itself does not require special skills and abilities, but various problems often arise when designing a remodel.
It is not the Gods who burn the pots - this is probably the saying that car enthusiasts are guided by before installing LPG on their car with their own hands. Let's look at the installation stages and try to mention all the difficulties that may arise during the installation process.
Step-by-step installation of HBO - main points
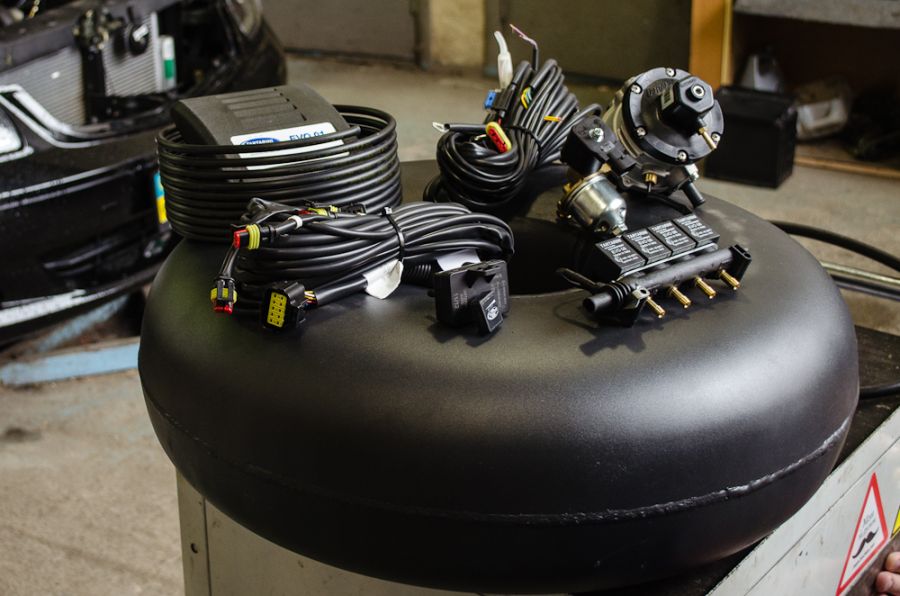
1. Selection of the necessary set of equipment
There are a lot of manufacturers on the market competing with each other. As a rule, there are no problems with well-known brands. You should select based on the recommendations of both the manufacturers themselves and car owners of cars like yours.
2. Selecting the gearbox mounting location and its installation
If you have to make holes, they must be treated with anticorrosive. must be rigidly fixed and located in an accessible place, which will facilitate its maintenance in the future.
3. Selection of location and installation of the control unit (CU) of gas equipment, if its presence is provided
We have already talked about rigid fixation. In addition, it should be taken into account that wires will be laid from and to it, including to the speed sensor, to the mode switch button in the cabin.
4. Fixation of gas injectors (frames)
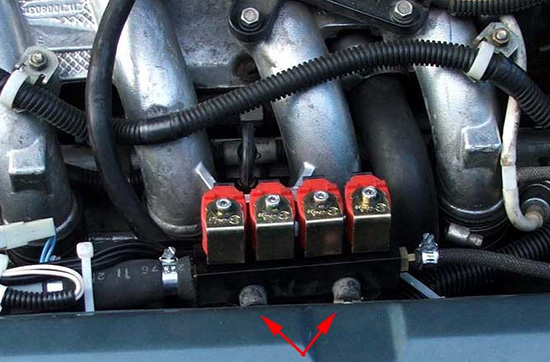
Important: the tubes from the injectors to the fittings tapping into the manifold must be the same length. The shorter the better.
5. Drilling the manifold for the fitting (in carburetor cars the carburetor body is drilled)

Advice: Before drilling, it is better to remove the collector, despite existing methods prevent chips from entering the collector. The holes should be as close to the gasoline injectors as possible.
6. Laying wires from the control unit to sensors, injectors and a button in the cabin
We must strive to ensure that the wires do not dangle or sag. Let there be more wires, but they will not be noticeable. All connections must be soldered and insulated with heat shrink. Do not confuse the supply wires with the impulse ones. When ringing, the power supplies show 12 V. The control unit is powered from one place that needs to be selected, and all other connections are with impulse wires: on gasoline injectors, on the crankshaft speed sensor. If you need to drill a hole for the wire to the button, then in addition to the anticorrosive agent you need to use rubber plugs.
7. Installation of the cylinder, multi-valve and filling device

The choice of seats is small - instead of a spare wheel or under the back of the rear row of seats. Sometimes they are mounted outside, under the bottom of the car. The space in the hatch sometimes serves as a place for the charger. They often make a hole in a car bumper - the choice is yours.
8. Laying the gas line

For the gas pipeline, both copper and polyurethane lines are used. It is more comfortable to work with the latter. The tube is laid along the bottom in a recess - usually where the main line passes brake system. That's it, completed.
Equipment setup
To do this, you need to fill the cylinder. Under pressure, you must immediately check all connections with a soap solution. In first-generation systems, manual configuration is carried out. If you have a control unit, setup is done via a computer with loaded software for your model.
If all of the above is not an empty phrase for you, then, as you can see, installation of gas equipment on your own - quite possible. But this can be resorted to only in cases of extreme necessity. After all, the specialists in the specialized service have their hands full and have the necessary experience. This will allow you to avoid “childish” mistakes and identify mistakes at an early stage of installation. After all, there are errors with a long-term nature of action, when they lead to disastrous results.
Installation of HBO on 2106: multivalve
In the article you will learn about how to install gas equipment on a VAZ 2106, what are the requirements for this process. It should be noted that this guide is intended for informational purposes only; only the main points are described without a deep dive into the topic. If you are faced with installation gas equipment first time, it is best to study in more detail the technical literature, as well as the recommendations of the LPG manufacturer.
Justification for switching to gas
We will talk about the 1st and 2nd generations of gas equipment. The third and fourth are not considered, since they are intended for installation on injection engines. Or diesel engines with an electronic control system. Of course, you can install fourth-generation equipment on a carburetor, but you will need to do a lot of manipulations. First of all, the engine needs to be supplemented with a variety of sensors, which will subsequently be connected to the electronic control unit. You will learn how to install such systems on injection engines in a separate article.
If you look at it from an economic point of view, then on VAZ 2106 cars, HBO pays for itself in about 30 thousand km. mileage If you use the car constantly, then this distance will be covered in a year and a half. But you should not install equipment on your car if annual mileage less than 20 thousand. This will turn out to be simply unreasonable; the installation will pay off in a few years. Let's say you often make long trips in your VAZ 2106 car. What will you get when working on gas fuel?
The most important thing is saving. The price of gasoline is rising, and so is the price of gas. But the cost rises almost equally. A liter of gas costs about half as much as gasoline. But you also need to look at consumption. If the carburetor is set up perfectly and you drive at a speed of no more than 120 km/h, then the gasoline consumption will be 7-9 liters in the combined cycle. With the correct settings of gas equipment, LPG consumption can reach 11-13 liters. Having made simple calculations, we can conclude that driving on gas will be much more profitable, even if the consumption is 13 liters. The price of all equipment is no more than 10 thousand rubles including installation.
But you get several more benefits from using LPG on VAZ 2106 and similar models. Service life motor oil It doesn't get much higher, but it gets higher. During operation, the gas burns without residue, no impurities settle in the cylinders. These impurities do not enter the lubrication system, which increases the oil life by 2 thousand km. mileage on average. Hence the longer service life of spark plugs - their electrodes become less clogged. Perhaps this will be enough to make your choice in favor of HBO.
Generations of HBO: which one to install on the carburetor?
Ideal for VAZ 2106 cars with a carburetor injection system, gas equipment of the 1st or 2nd generation is suitable. Its price is not very high, there is no electronic system controls, as on the 4th generation. There are not very many differences between the first and second generations. The carburetor is connected to the dispenser using a gas hose. There is a minor difference in the design of the dispenser itself. For example, the first generation uses manual dispenser adjustment. Its configuration is carried out immediately after installing the HBO. Subsequently, its position must be adjusted from time to time.

But the second generation LPG has an electric dispenser drive. It uses a specially designed stepper motor. But for this system to work, the following conditions must be met:
- the car must use an electronic carburetor;
- The exhaust system must have an oxygen sensor.
As you understand, VAZ 2106 cars do not use an electronic carburetor. Therefore, it would be more reasonable to use a conventional mechanical type dispenser; you will now learn how to install such a system. As a result, you get equipment not of the 2nd, but of the first generation.
But we can make a small reservation. If we assume that the first generation of HBO is the systems that were used half a century ago, then the second is equipment with mechanical dispensers. Therefore, the third generation is devices with electronic dispensers. The fourth generation is for work on injection engines. The fifth generation is practically a copy of the 4th, only a special pump is installed in the gas cylinder to eliminate the need to install a gearbox. The division of HBO into generations is very relative.
Set of gas equipment

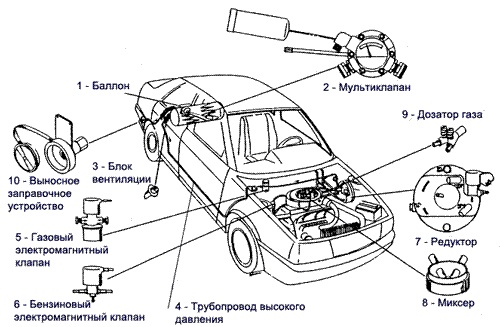
Before you begin installing the equipment on a VAZ 2106 car, you need to check the completeness. You must have all the necessary elements and components. Let's take a closer look at all the components and figure out what they are intended for. So, here is a complete list of 2nd generation HBO elements:
- Gas fuel cylinder. It stores gas that is used to power the engine. The most common shapes are toroidal and cylindrical. The latter takes up a lot of space in the luggage compartment and is usually mounted on the back of the rear seat. But the toroidal one in the VAZ 2106 will not save the situation. After all, this is not an eight or nine, there is no niche for a spare wheel. Therefore, from an ergonomic point of view, it does not matter which cylinder you put in your car.
- A multivalve is necessary for the full functioning of any generation of gas equipment. With its help, gas equipment is switched between two modes - “operation” and “refueling”. This valve opens the way to the filler hole or to the fuel line going into the carburetor.
- The refilling device is a gas hose designed to operate under high pressure. One end of the hose is connected to the filling fitting, and the other to a multivalve installed on the cylinder.
- Line designed to operate under high pressure. It is used to connect the gas reducer to the multivalve.
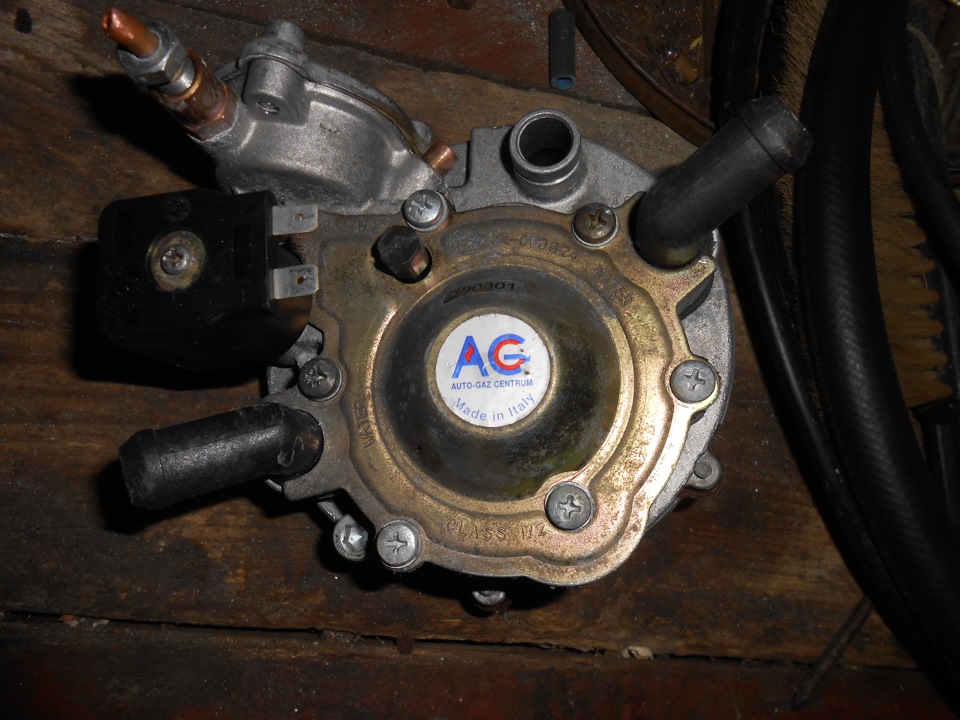
- The evaporator reducer serves to reduce fuel pressure. In installations operating on a propane-butane mixture, single-stage reducers are used, since the pressure in the cylinder and line is no more than 16 atm. For methane plants, two- and three-stage ones must be used, since the maximum pressure value can reach 200 Atm.
- The gas valve opens and closes the fuel supply to the evaporator reducer.
- The gasoline valve is necessary to open and close the gasoline supply to the carburetor. The operation of both valves is synchronous: the gas valve is open, the gasoline valve is closed and vice versa.
- A mechanical or electronic type dispenser allows you to adjust the gas supply to intake manifold. With its help, the amount of fuel that needs to be supplied to the combustion chamber is regulated.
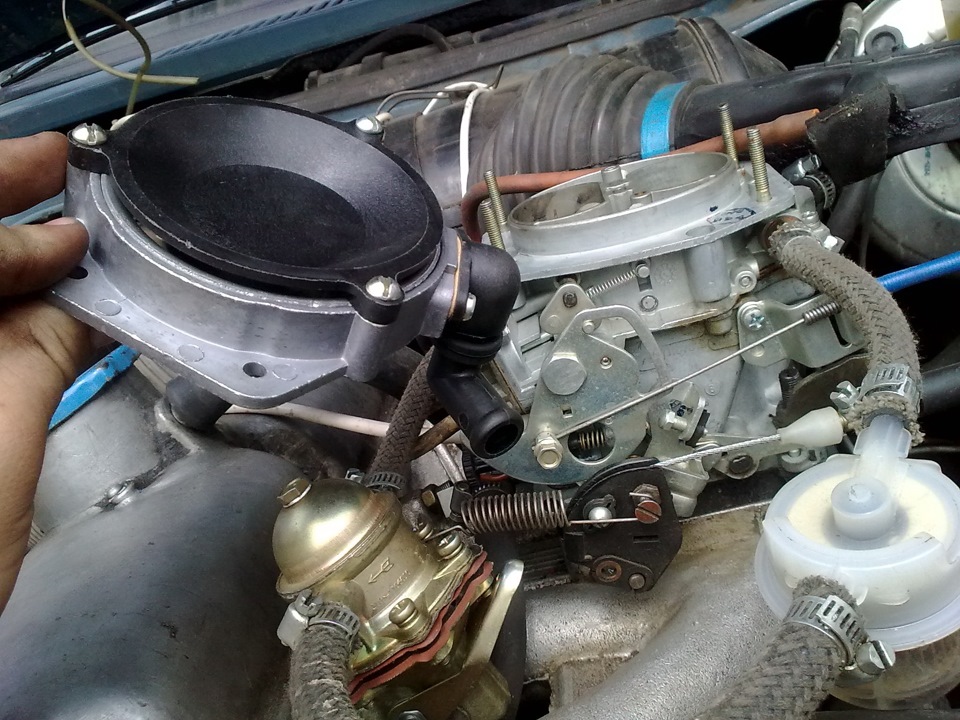
- The mixer is installed if there is no insertion into the carburetor. With its help, gas is supplied to the carburetor.
- Fuel type switch. A button that is mounted in the interior of a VAZ 2106 car. It is used to open and close the gas and gasoline valves. Without it, gas equipment simply will not be able to work.
How is HBO connected?
So, now we need to consider how to install a 2nd generation LPG on a VAZ 2106. Let’s get into the engine compartment. Installed there gas reducer and valve. The gearbox input is connected to the valve output. The end of the high pressure fuel line is connected to the valve inlet. All lines that operate under high pressure are made of copper. Low-pressure lines use rubber hoses through which gas passes.

A pipe from the cooling system is also connected to the evaporator reducer. On a VAZ 2106 car, the gearbox can be installed on the right side, not far from the stove. You will only benefit because it is nearby exhaust manifold, which means that there is a high temperature in this part, which will contribute to faster heating of the gearbox. The connection to the cooling system can be made as follows:
- Disconnect the pipe going to the heater radiator.
- Install a pipe from the pump to the gearbox housing. It is used to supply hot antifreeze.
- A second pipe is installed from the gearbox to the stove tap.
Consequently, the device is heated through the stove circuit.
After the gearbox, the regulator is installed and then gas must be supplied from it to the carburetor. Gas fuel can be supplied to the carburetor in two ways:
- Using a mixing spacer.
- Using a tap into the carburetor.
To feed using the latter method, it is necessary to drill holes in the carburetor chambers. Cut threads into them and screw in special fittings. Gas pipes are connected to the latter.
What to consider?
Yes, there are many nuances that you should definitely follow when installing an LPG on a VAZ 2106 car. The article contains a video that talks in more detail about all the subtleties. However, this section will be relevant for any make and model of car, as it describes the intricacies of installing gas equipment. Let's start from the very beginning - with the balloon. It must be placed in such a way that the axis of the multivalve is located at an angle to the horizontal plane.

Moreover, the angle should be exactly 30 degrees. Not a degree more or less. If installed at a different angle, the FLS will show “weather” and the fuel intake from the tank will be unstable. Therefore, when installation is carried out, you need to pay attention to all, even the most insignificant, points, otherwise the cost of incorrect installation will be incredibly high.
The refueling fitting on a VAZ 2106 car is best secured in the rear, right under the bumper. The line is laid along the bottom of the car. All this work should be carried out in an inspection hole, since it is almost impossible to install tubes without it. Laying them with your own hands is quite simple. The main thing is to install the line next to the gasoline line. You can even attach it to the gasoline pipe using plastic ties.
There are no special requirements for the fuel selection button. The most important condition is that it is convenient to turn it on. To install the gasoline valve, you need to cut the fuel hose between the pump and the carburetor. But the gas one must be installed in the engine compartment on the right side. Pay attention to the installation of the evaporator reducer. It is not difficult to install it with your own hands, but you must adhere to some requirements:
- Its location should be lower than the uppermost pipe going to the stove.
- Its location should be longitudinal, this will avoid problems with the diaphragm during sudden acceleration or braking.
The installation of the mixer also has some features. It is placed in the carburetor, located between the two halves - the body throttle valve and the carburetor itself. Of course, the height increases, so you need to purchase the required number of bolts. Their length should be three turns longer than the standard ones.
How to adjust the gearbox yourself?
That's all, we figured out a little about how to install gas equipment on a car with a carburetor injection system with your own hands. Now I would like to configure it correctly so that the consumption is lower and the throttle response remains the same as on gasoline. To do this, you need to use the following guide. First of all, you adjust the ignition; you need to set it a little earlier - turn the distributor body two notches (this corresponds to 10 degrees).
To make fine tuning, it is best to use electronic octane correctors. But for their normal functioning, a BSZ will be required. The reason for adjusting the ignition is that gas fuel has an octane rating of over 100. And if the adjustment is not made, the exhaust valves will burn out, and the cost of repairing them will be very significant.
You adjust the enrichment of the fuel mixture; the screw is located on the evaporator reducer. Make sure that the number of crankshaft revolutions is in the range of 800..900. Now you need to adjust the gas fuel supply. To do this, you will need to screw the bolt on the valve until it stops. Then unscrew it two turns. This should be done with the engine turned off; after unscrewing the valve two turns, you can start it. Listen to how the engine works. If you sharply and briefly press the accelerator pedal, the revolutions should instantly reach 3000.
In this case, no delays should be observed. If the motor begins to “choke”, it is necessary to rotate the screw counterclockwise until this symptom disappears. You can do the entire setup yourself in just a few minutes, since only three screws can be adjusted. Screw in the second screw until it stops and turn it one turn counterclockwise. Start the engine and sharply depress the accelerator pedal.
Do-it-yourself installation of HBO on 2106 quickly and efficiently
4.1 - Ratings: 78We also recommend
 The relationship between man and nature
 Contemporary heroes. Heroes of Russia. Work for courageous people
 Temple of the Tikhvin Icon of the Mother of God on Ave.
 The miraculous icon of St. Nicholas of Zaraisk St. Nicholas of Zaraisk with life
 How to smoke cheek meat at home
 Receiving a property deduction through an employer